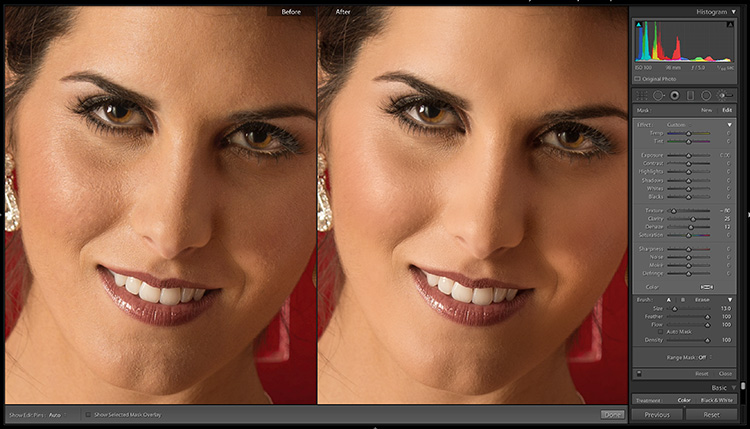
I’m just back from Photoshop World (it was incredible — I’ll share some pics and stories in a few days), but today I’m sharing a skin softening technique I picked at the conference from one of the instructors — Dutch photographer, and author of the book “Mastering the Model Shoot,” Frank Doorhof. It’s very simple, but very effective.

It’s a combination of three sliders
You use the Adjustment Brush to paint over the skin, avoiding detail areas like eyes, lips, eyebrows, hair, etc.), but using just these three sliders:
- You lower the Texture amount (Dragging to the left a lot). This applies the softening effect, but it does it without making the skin plastic (like using negative Clarity does). Here I dragged the Texture slider to -80).
- You increase the Clarity amount (dragging it to the right) a bit to bring back some detail (here I dragged it to +25)
- Then you use the Dehaze slider to controls the mix of the shadows and highlights on the face (when you drag the slider back and forth you’ll see how it affects those areas).
It’s a dance
It takes a little experimenting and tweaking with the sliders to get the right amount for each for the particular image you’re working on. I’ve found it only takes a few seconds to get it dialed in, and the results usually better than just using the Texture slider by itself. Give it a try and see what you think. Thanks to Frank for sharing this technique. 
I’m off to Boston and Philly this week
No rest for the weary — just back from Photoshop World, and Wednesday I’m off to Boston for my seminar there Thursday, and then Friday I’ll be in Philadelphia for my new “Ultimate Photography Crash Course” seminar. If you’re in either one of those cities this week, come out and spend the day with me. Tickets and details here.
Have a good one everybody!
-Scott
The post Enhanced Skin Softening Technique in Lightroom appeared first on Lightroom Killer Tips.
