The holidays are often a time when people get a new computer, and the idea of transferring your Lightroom Classic catalog and all of your photos to a new computer can seem daunting at first, but once you know the basics you’ll find it is pretty straight forward. In addition, completing the process will make you a more confident user of Lightroom Classic.
[Editors note, this article appeared in the December 2020 issue of Photoshop User Magazine]I first wrote about this subject for Photoshop User magazine back in 2010, but I still see lot’s of questions on this topic so I thought it was time for an update. I think it is safe to say that a lot of things have changed since then. Within the context of transferring Lightroom Classic to a new computer, there are essentially three components that you want to transfer from your old computer to the new machine:
- 1. Your photos.
- 2. All custom presets, templates, and third-party plugins.
- 3. The Lightroom Classic catalog (and its associated cache files).
I want to point out that there are a few ways to successfully migrate this stuff to a new computer, but I am only going to highlight one method that will get all of your data safely copied to a new computer (leaving it on the old computer until you are ready to remove it), keep you in the driver’s seat every step of the way, and ensure that you know where all your files are when the job is done. While I am writing this with a focus on the latest Lightroom Classic the basic steps apply to earlier versions of Lightroom Classic as well (though worth noting that I am not referring to the new cloud based version of Lightroom, which doesn’t require any of this since all photos and edits are stored in the cloud). One more thing, in the interests of simplicity I will refer to Lightroom Classic as just LrC from here on in this article.
Before You Start
While you can transfer files over a network connection, having a large capacity external drive (or multiple external drives if needed depending on the number of photos you have) is going to make this process much simpler and faster, and that is the method I recommend. Also, do yourself a favor and make sure you have a good solid backup in place before you begin.
The process I am going to share works just as well if you are transferring between two computers with the same operating system or two different operating systems. The LrC catalog is cross-platform compatible, which means a catalog that started on Windows can be opened on a Mac (or vice versa). Note: If you are migrating between Mac and Windows you will want to use an external drive that is formatted as either exFAT or FAT32 because both Windows and Mac can read and write to/from a drive with either filesystem. An alternative is to use third-party software that let’s a Windows computer read/write to Mac OS Extended, or that allows a Mac to read/write to an NTFS formatted drive (this is what I do).
You’ll also want to resolve any cases of missing/offline photos before you go any further. Here’s a tutorial I’ve written to help you get this done: https://lightroomkillertips.com/when-photos-go-missing/
Preparing the New Computer
The main thing to do on the new computer is to install the latest version of LrC. As a Creative Cloud subscriber you can just install and log into the Creative Cloud Application Manager on the new computer and then install LrC (and any other Adobe software within your subscription). Adobe’s End User License Agreement allows you to log into the Application Manager on two computers simultaneously. LrC is truly cross-platform, so even if you are changing operating systems (Win to Mac or Mac to Win) you just use the same Adobe ID and password in the Application Manager on the new computer. Don’t bother launching LrC yet on the new computer, just install the software and go back to the old computer so we can gather up all the pieces to bring over.

Migrating Your Photos
Stored within your LrC catalog is the complete path to each imported photo, from the volume name (PC: drive letter) to the file name, and every folder in between. If something in that path changes outside of LrC, then the path stored within the catalog becomes out of sync with your photos’ actual location. In the process of migrating from one computer to another it is very likely that something in that path will change. This is not a big deal, and the process to update the catalog at the folder level is very straightforward (we’ll go over that when we get to the new computer). The moral of the story is that if all your photos are stored within a single parent folder (no matter how many subfolders are within it) then once you get to the new computer you only need to update a single folder to get every subfolder and photo up to date. I realize that there is no single right way to store photos and your photographic situation may be slightly more complicated for good reason, in which case you may need to update more than one folder.
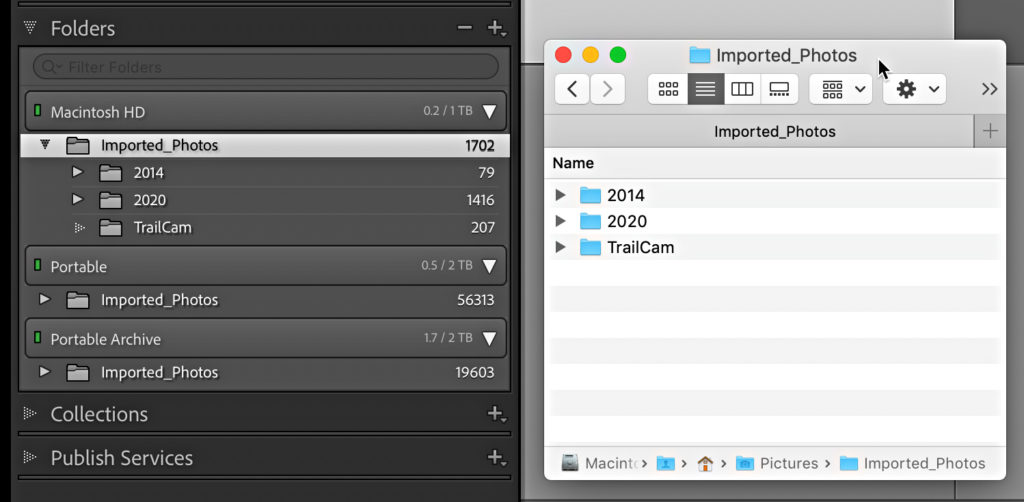
For example, on every drive I use to store photos, I maintain a structure that starts with a single parent folder that contains multiple levels of subfolders for all the actual photos. This keeps things very simple for portability and backup. This parent folder is at the top of the tree in the Folders panel. If I open a Finder window to that same location you can see the same folder structure is shown there too.

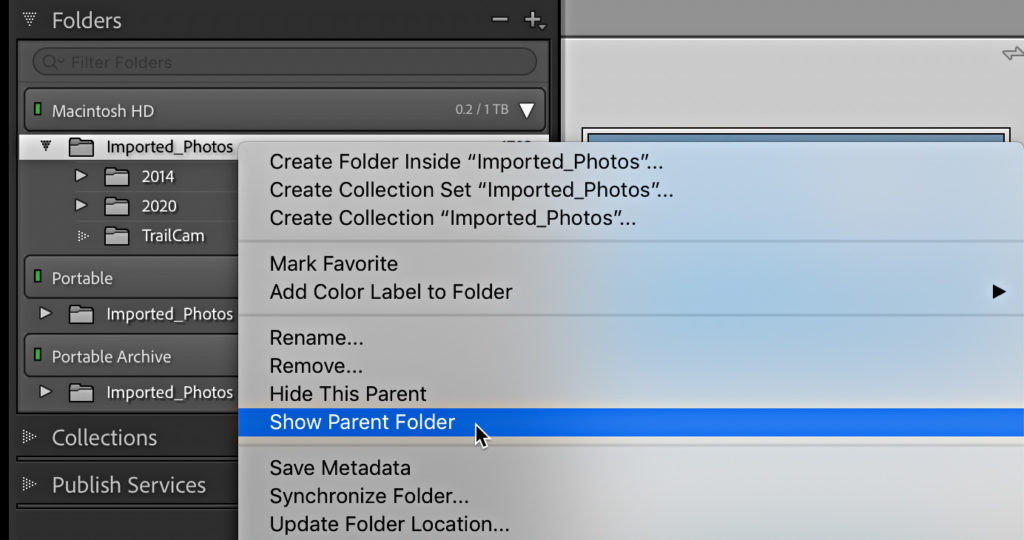
OK, so what if you do keep all your photos in a single folder but the top-level folder is not showing in the Folders panel? Just ctrl-click (PC: right-click) on the top-most folder and choose Show Parent Folder from the contextual menu that appears. That will bring that parent folder into the Folders panel. On the flip-side, if you have too many levels of parent folder showing in the Folders panel you can hide unnecessary folders by ctrl-clicking (PC: right-clicking) on the top-most folder and choosing Hide This Parent. Typically, just having one level of parent folder above the folders containing your actual photos works best.

If your photos are already on an external drive that you are moving to the new computer then there is no need to copy your photos to yet another drive (this is what I am doing). Just be prepared to connect that drive (or drives) to the new computer, and skip ahead to the next section on presets and plugins.
If you need to migrate your photos from the old computer to an external drive, then here’s what to do. With LrC closed, copy (don’t move) the parent folder containing your photos (and its contents as-is) to the external drive you are using to transfer the data. Remember, don’t change the existing folder structure, just copy it to the external drive (by maintaining the folder structure it will be easier to reconnect to the catalog on the new computer).
Ok, we’re making good progress, and staying in the driver’s seat along the way. Join me next week as we wrap this process up with a look at how to migrate the catalog, presets, and templates, and then make sure everything is working on the new computer.
Have a great holiday, and stay safe!
The post Transferring Your Lightroom Classic Catalog and Photos to a New Computer appeared first on Lightroom Killer Tips.
