

HEADS UP: Tomorrow is the kickoff of Adobe’s annual Max Conference, and historically Adobe releases big updates to Lightroom during their opening keynote. Now, if that were to happen, and it was something really big, I would probably have a full length course all ready to go for release tomorrow to get KelbyOne members up to speed fast, and lots of coverage here on all the new Lightroom features from Rob Sylvan, but of course, that’s only if Adobe releases something really earth shattering, and of course, who knows if that will happen, but if it did, well…we would be ready. Just sayin…
OK, on to today’s tutorial:
It seems like edge effects are making somewhat of a comeback (these things go in cycles), so I thought I cover how to use them inside of Lightroom Classic (this one requires Classic’s Print Module, even though you might not be making a Print, but you can use it anyway).
This is super easy to do (even if you’re new to Photoshop). Here we go:
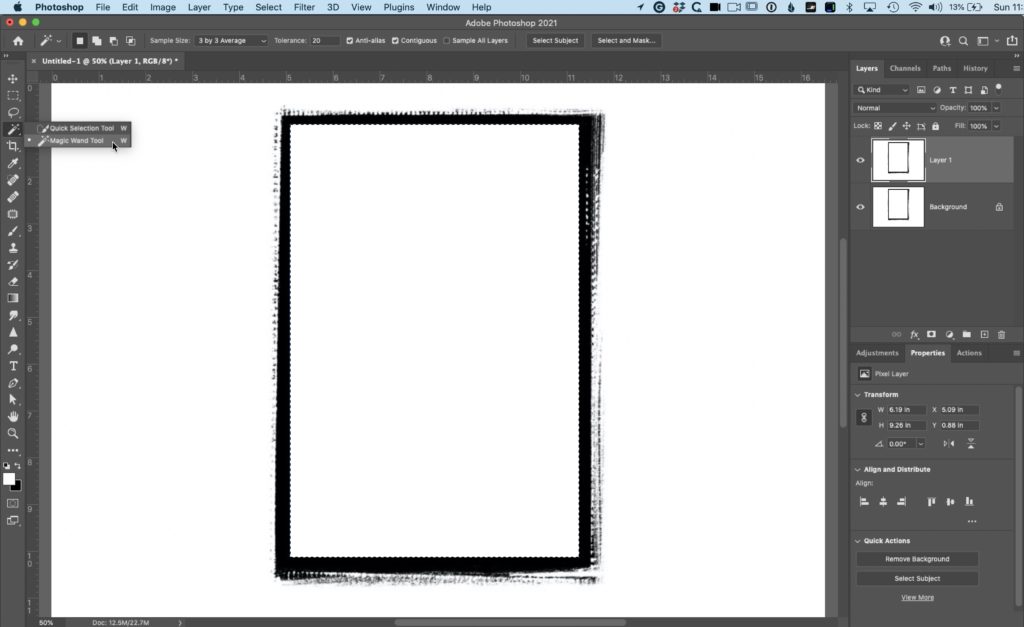
STEP ONE: First, you’ll need an edge. You can download free edges from the Web (there are a ton of them out there for free download and use) or you can find loads of them on inexpensive stock sites. What we need to do is make the center of the edge image (that white area) transparent. So, to do that start by duplicating the background layer (press Command-J on Mac, or Ctrl-J on a Windows PC). Then get the Magic Wand tool from the toolbar (as shown here) and click it once in the center of the image to select that entire white center area inside the edge (as seen here where the inside center white area of the edge is selected).
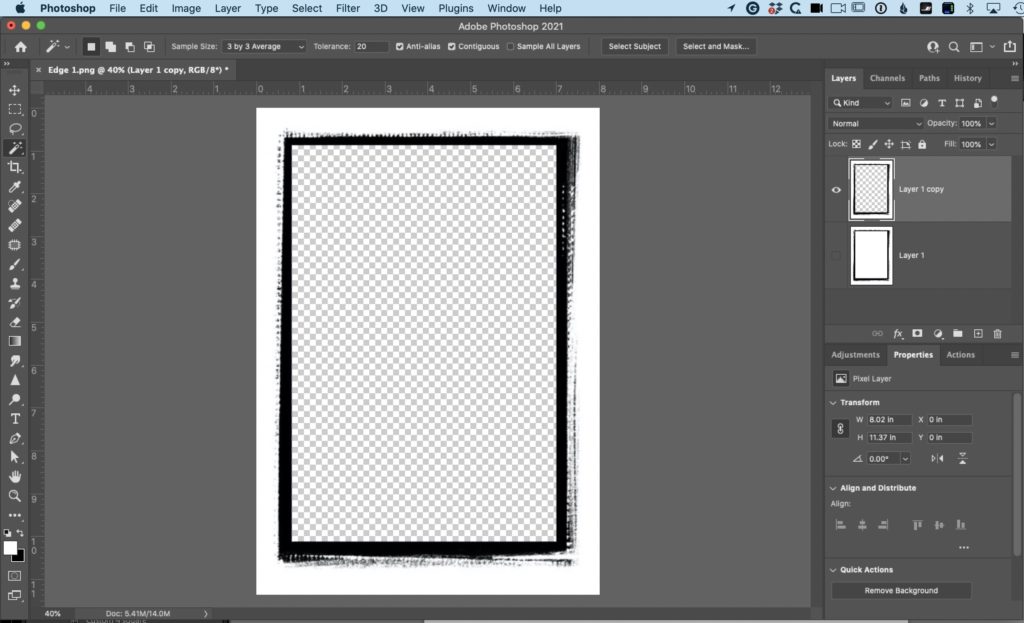
STEP TWO: Once that white center area is selected, hide the background layer from view by clicking on the little “eye” icon to the left of its name over in the Layers panel. Now hit the Delete key and it deletes that white area you selected on the top layer. The gray and white checkerboard shows you which parts of the image are transparent, so as you can see, the entire area that was white, is now fully transparent. While you’re there, get the Crop tool and crop it fairly tight like you see here. Now, you can click and drag that original background layer (named Layer 1) into the trash can at the bottom of the Layers panel to delete it.
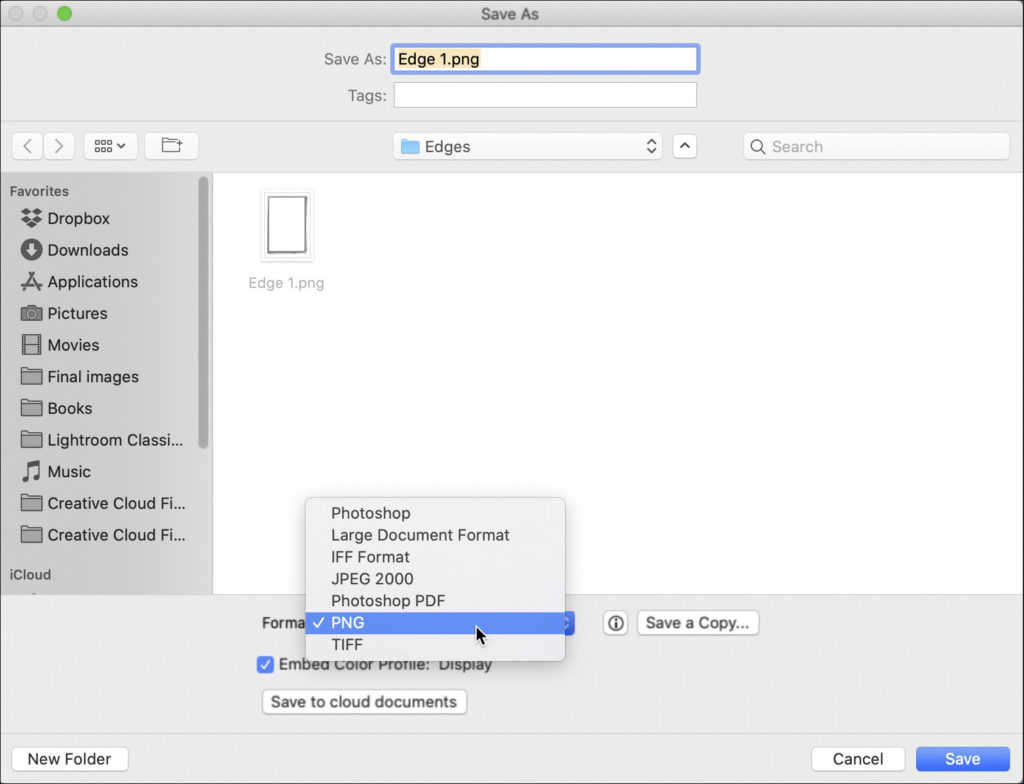
STEP THREE: To keep that transparency intact when we go over to Lightroom, all we have to do is the save the Photoshop file as a PNG, so head over to Save As and when the Save As window opens, from the Format pop-up menu choose “PNG” as shown here. A PNG format options window will appear. Just choose, “Large Size” and will and click OK.
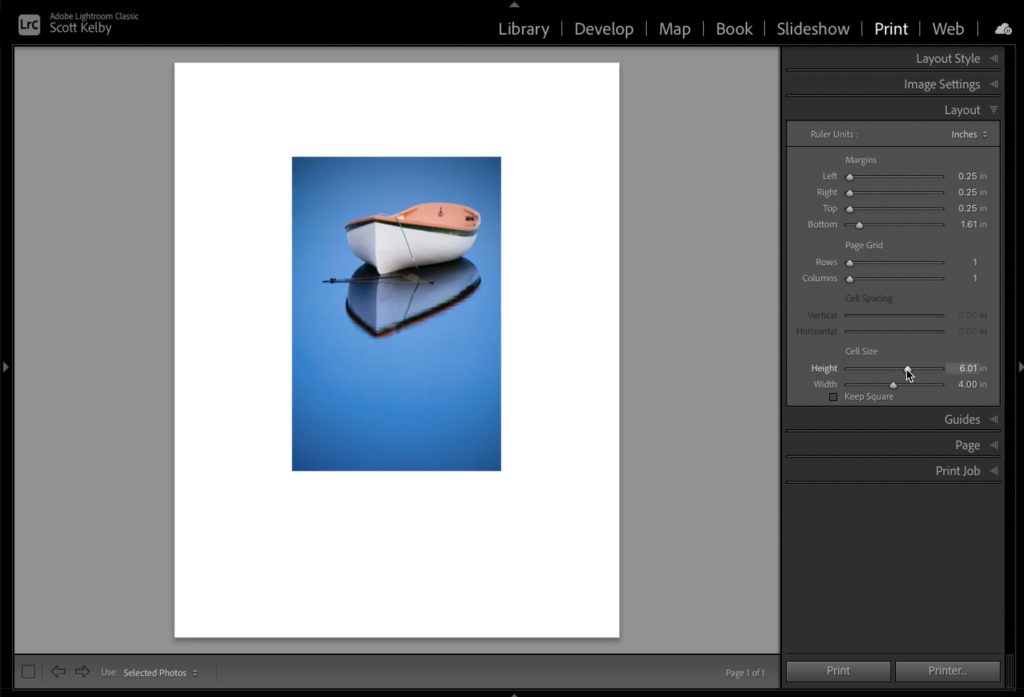
STEP FOUR: Now to go Lightroom Classic and click on the Print module. Choose a template from the Template picker in the left side panels (I chose the Maximum Size template). Go to the Image Settings panel and turn on the Zoom to Fill checkbox (so your image fills the cell), then go to the Layout panel and use the Margin and Cell size sliders (as shown here) to get your image to the size and position on the page where you want it.
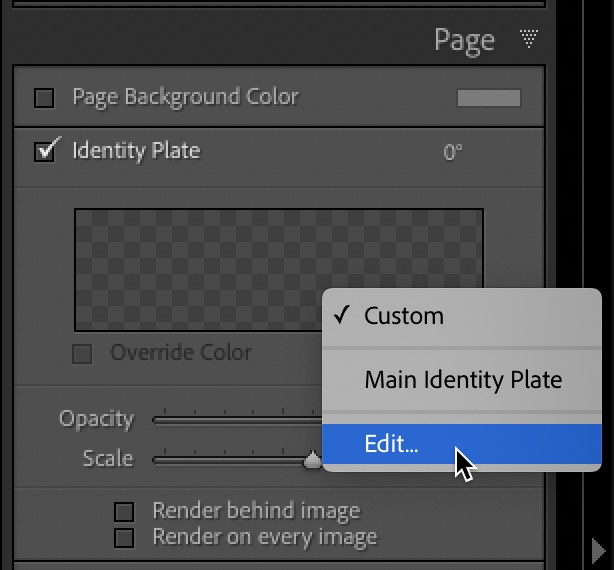
STEP FIVE: Go to the Page panel and turn on the checkbox for Identity Plate. This is the feature we’re going to use to bring that transparent center edge image into Lightroom. Once you’ve turned the checkbox on, click anywhere inside that gray checkerboard area and a pop-up menu appears. Choose ‘Edit’ (as shown above).
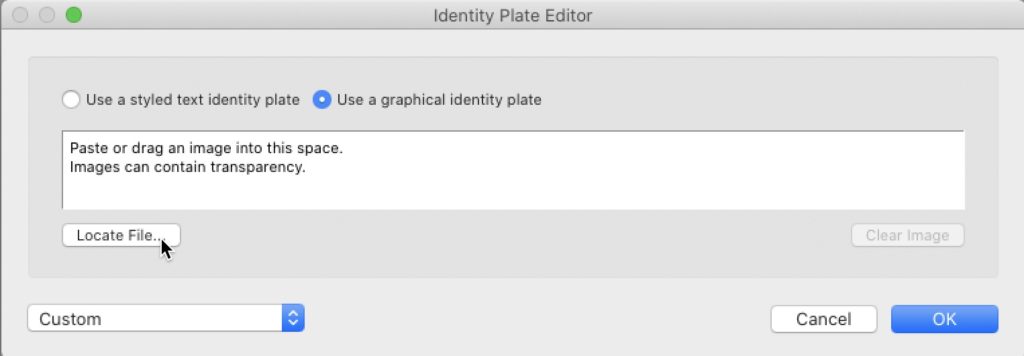
STEP SIX: Clicking ‘Edit’ brings up the Identity Plate Editor you see above. Since we’re going to use that edge graphic we edited in Photoshop, you’ll need to click the ‘Use a graphical identity plate’ button up top, and then click the ‘Locate File’ button (as shown here). This brings up a standard ‘Open” window, so navigate to wherever you saved that edge graphic and click the ‘Choose’ button.

STEP SEVEN: This brings the edge image into Lightroom, and you can see the center of it is transparent because by default it appears over your image (as seen here), but of course, it probably won’t be the exact right size so in the next step we’ll resize it to fit your image.
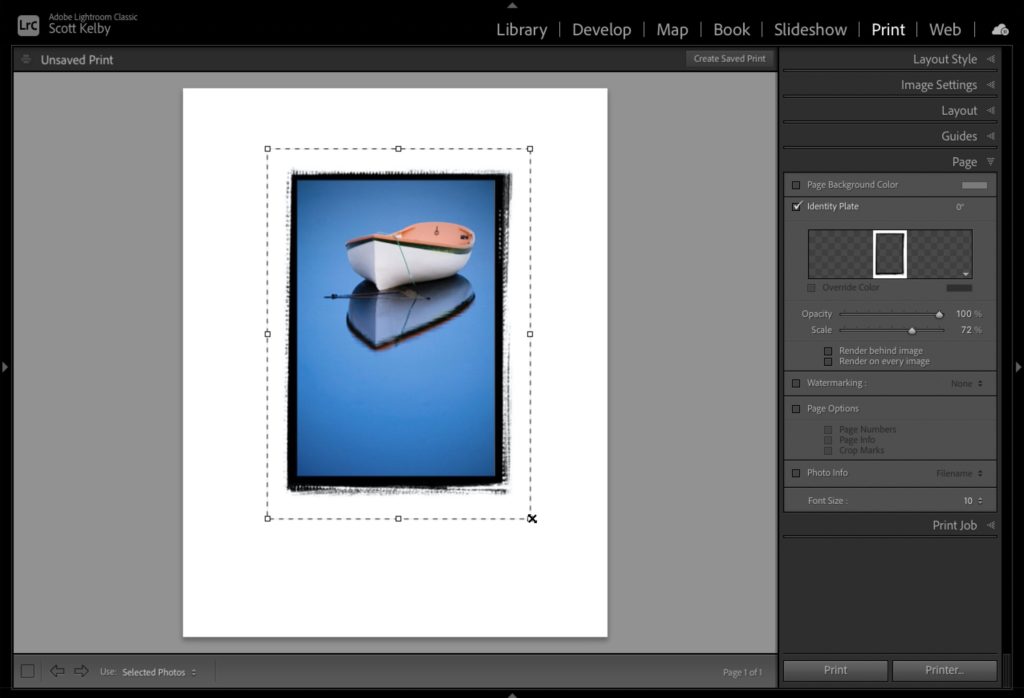
STEP EIGHT: You can use the corner handle that appear around your graphic to scale the edge down to size, and you can click and drag anywhere inside that border to reposition the edge so it fits your image. It only allows you to scale proportionally (so you can’t drag just drag one side or the other to move just that size), so you’ll want to make sure, back in Photoshop, that the center of the edge is the proper size to fit a digital image (Oh, now he tells me). Luckily, most edges you download will already be perfectly sized to fit a standard image.
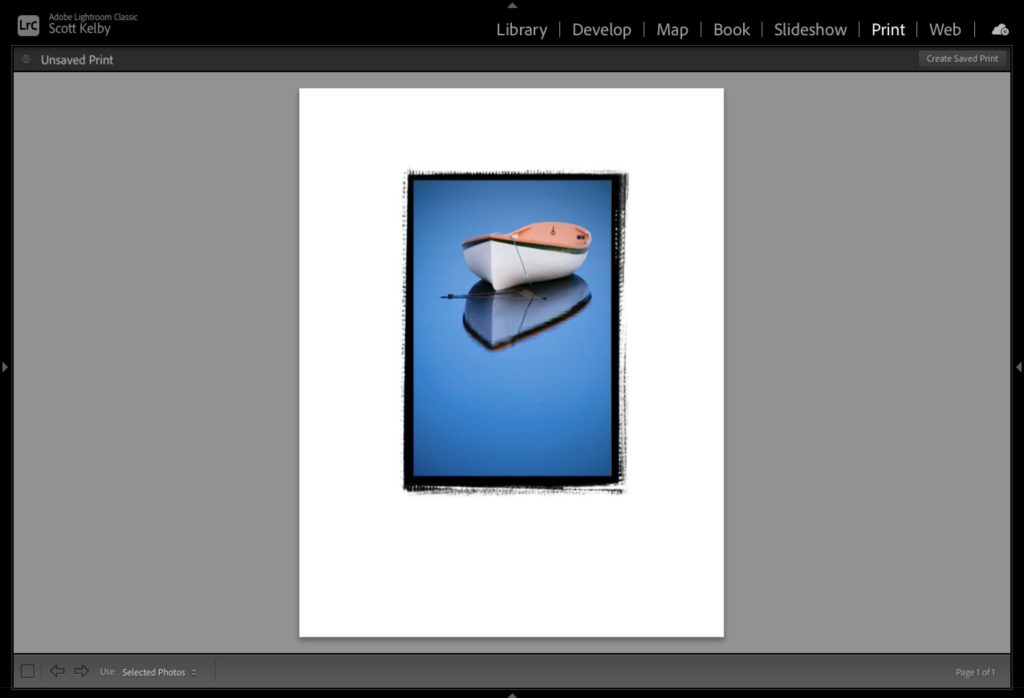
STEP NINE: When click off that border, the border handles are hidden from view and you see your final image (as seen above). To save this image as a JPEG, go to the Print Job panel (bottom of the right side panels), and from the ‘Print to’ pop-up menu choose “JPEG File.” That’s all there is to it.
NOTE: You might be thinking, “Scott, I see in the Identity Plate area of the Page panel, there’s a checkbox for ‘Render behind image.’ Why can’t we skip the whole Photoshop transparency part and just bring in the edge and put it behind our image?” It’s because, while that sounds easier, it’s actually not. You’ll spend a lot of time futzing around with the margin sliders and cell sliders to get your image to fit properly (I’ve tried), and so this is actually a much faster, easier way. Plus, once you’ve saved that file with a transparent center, now you can skip the Photoshop part going forward and just pop this edge in anytime you want.
OK, that’s a lot of steps for something so easy. It is, but again, part of it (the first three steps) you won’t have to do again – you’ve created a transparent center graphic you can use anytime without going to Photoshop again.
Where will you be next week…
…when some of the most talented portrait photographers on the planet take the stage to share their favorite portrait photography tips, tricks, and trusted techniques. The Portrait Photographer’s Conference kicks off next Monday with an orientation and then a pre-conference workshop on “What Makes a Great Portrait” and then Tuesday and Wednesday we’re diving in with both feet in two simultaneous training tracks. This is going to be so helpful, so if you’ve ever wanted to start taking portraits, or you (or someone you know) is already making portraits and you want to take your work to a whole new level, this is for you. Here’s the link for more details and to get your ticket now (and save a bunch).
Here’s to a totally kick-butt Monday!
-Scott
The post Adding Edge Effects To Your Image in Lightroom Classic appeared first on Lightroom Killer Tips.