
Well, as 2019 draws to a close I think it is a good time to review some Lightroom Classic housekeeping chores you can take care of over the holidays.
Set Your Default Catalog
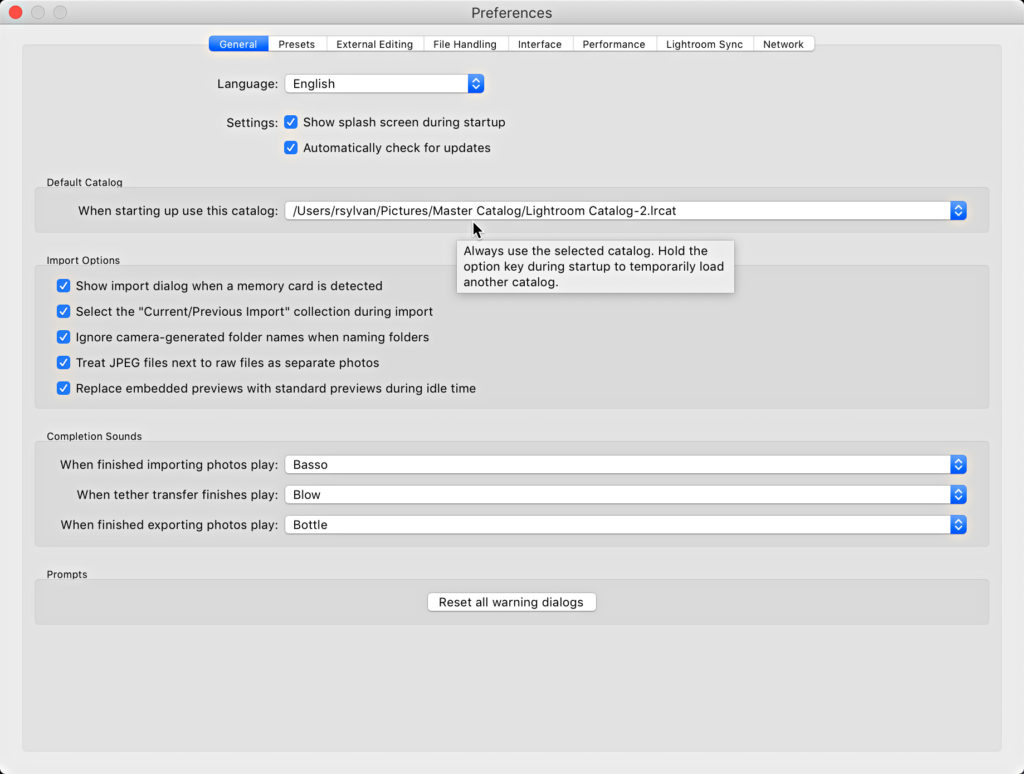
There’s probably no more important thing for your day-to-day sanity when using Lightroom Classic than being absolutely certain you are always working in the correct catalog. The best way to do that is to go to Preferences > General, and configure the Default Catalog setting to be the specific catalog you always want to open instead of the Adobe default of Load most recent catalog. Here’s a more detailed set of steps if you need it (with pictures), but just be sure you remain in control of this important decision.
Make Sure You are Backing Up Your Catalog
This goes hand in hand with the previous bit of advice. Go ahead and take advantage of Lightroom Classic’s built-in catalog back up function. It’s free, and even provides an integrity check of your catalog as part of the process. Sure, you already backup your entire system, including the catalog, and that’s great. But having this extra backup copy of the catalog can be a real easy way to protect yourself against data loss, accidental deletion of data from your working catalog, or catalog corruption.

Clear Out Old Copies of Your Backup Catalog
If you’ve been wisely using that catalog backup function for awhile you’ve probably got some old backup copies of the catalog just taking up hard drive space and waiting for you to jettison them out the hatch. Each time Lightroom Classic’s catalog backup function runs it creates a new copy of the catalog (at that moment in time), saves it in a date based folder at the location you chose (see previous section), and then compresses it into a zip file.

If you ever need to restore from a backup copy you’ll go to the most recent backup right? You’re not going to skip over the most recent and jump back to one from 3 months ago. So, I recommend periodically going into the folder where your backup catalog copies are saved and just delete the oldest ones. I usually keep 3 – 4 most recent copies (just in case) and delete the rest. If you don’t periodically remove the oldest ones Lightroom will just keep creating new backup copies until it fills up your drive.
Invest in an Offsite Backup System
I’m sure you are already backing up all of the data on your system to a local hard drive (set of hard drives). Mac and Windows both have built in functions for backing up all of your data, so start there. There’s no sadder Help Desk messages than from those folks who lost a hard drive and didn’t have it backed up.
Once you have a good local backup system in place consider adding in an offsite backup system to protect against loss, theft, or disaster that can strike your local backup drives. The best local backup system in the world can be undone by thieves, accidents, and natural disasters. In addition to my local Time Machine backup, I use an online service (Backblaze, but there are others) to continually backup my local drive and connected external drive to the cloud. My hope is to never need the cloud backup, but feel grateful if I ever do. Note, it does take awhile to get all of your data backed up initially, but once the bulk of it is uploaded it does keep up with new content.
If you don’t have good internet access where you live you can duplicate your local backup drives, and physically store the copy in another location (like your office, neighbor’s home, family member’s house, etc.), and then periodically update the remote copy and take it back. You can use a program like Carbon Copy Cloner on Mac or Vice Versa Pro on Windows to clone the contents of one drive to another.
Clear Out Those Photos You Marked as Rejects
You know, the ones you assured yourself you’d come back and clear out when you had a moment. Since we have already established that you are backing up your catalog and your entire system, you can safely go ahead and delete all of the photos you previously flagged as rejects.
- Click on All Photographs in the Catalog panel.
- Press G for Grid view (if not there already).
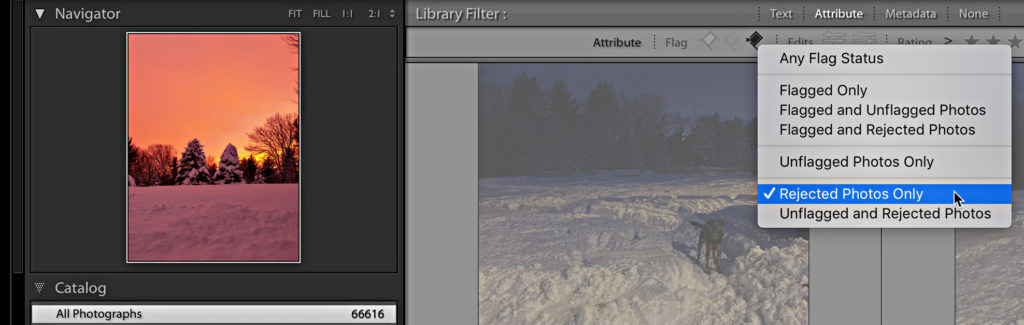
- Click the Attribute tab of the Library Filter bar to expand its options.
- Right-click on the Flag icons and choose Rejected Photos Only to see if you have any (make sure no other criteria are included).
- Double-check that you really want to delete them (unflag any you want to keep).
- Go to Photo > Delete Rejected Photos to get rid of all the rejects.
Thank you all for your comments and questions this year. I wish you all a very happy Holidays!
The post End Of Year Housekeeping for Lightroom Classic appeared first on Lightroom Killer Tips.