
BREAKING NEWS: Before we get to the new Lightroom features, just a quick heads up: Today we announced the KelbyOne Photoshop Conference, coming July 14-15, 2020 — it’s sponsored by Adobe, and Photoshop User magazine, and it’s going to be awesome. Two days, two tracks, all online, super-affordable — it’s like our Lightroom Conference, but all about teaching you Photoshop. Check out the video below to see if it’s for you.
Here’s a link with all the details and ticket info. I hope you can join us. It’s going to be something really special and I want you to be a part of it. OK, on to the Lightroom update (I covered all the new Photoshop features for photographers in today’s update over at scottkelby.com).
What’s New in Lightroom
While we did see a minor update come out in April, we haven’t seen a significant number of new features since the update released in February. There’s a lot of welcome additions to Lightroom Classic and the Lightroom cloud ecosystem of apps, but the first thing to be aware of are the branding changes made to the Lightroom Classic and Lightroom. These branding changes are in line with what Adobe announced for Photoshop and the rest of the Creative Cloud applications at the end of May.

Note the new icons shown in the respective splash screens above have replaced the old icons for each program. The big difference being that Lightroom Classic is LrC and the Lightroom cloud for desktop icon is just Lr. Let’s look closer at the updates for each program in the Lightroom family.
Lightroom Classic
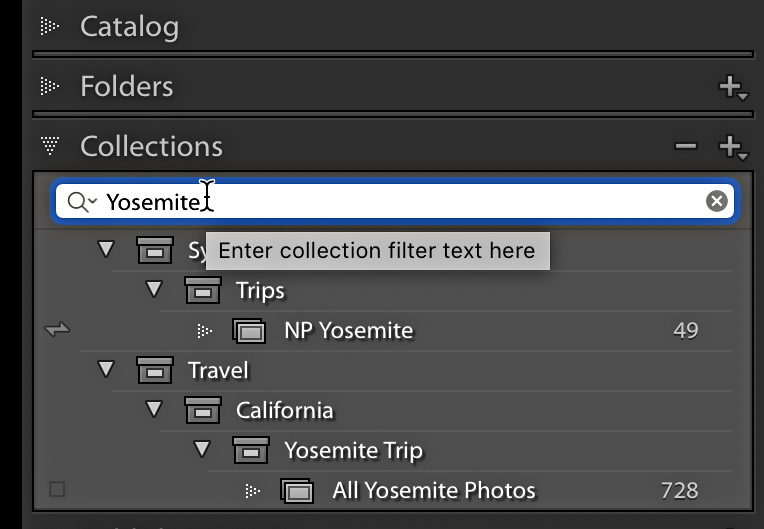
Performance is always high on everyone’s list of needed improvements, and Adobe continues to work toward that end. This update includes improved performance when scrolling through thumbnails in the grid when using a mouse, arrow keys or trackpad. They’ve also tweaked the Collection panel search filter (easily overlooked), which should help those of us with a large number of collections. They’ve also continued to optimize the movement of sliders in the Develop module, which is always welcome.
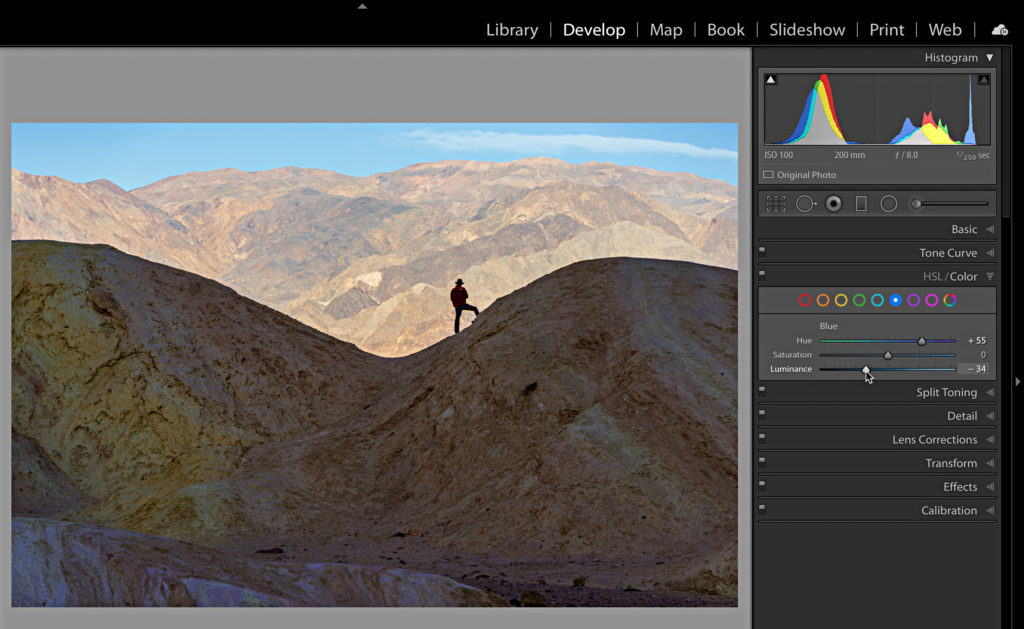
You will also notice a couple of interface refreshes within two of the Develop module panels. The Color part of the HSL/Color panel got a new look to the buttons for switching between colors.
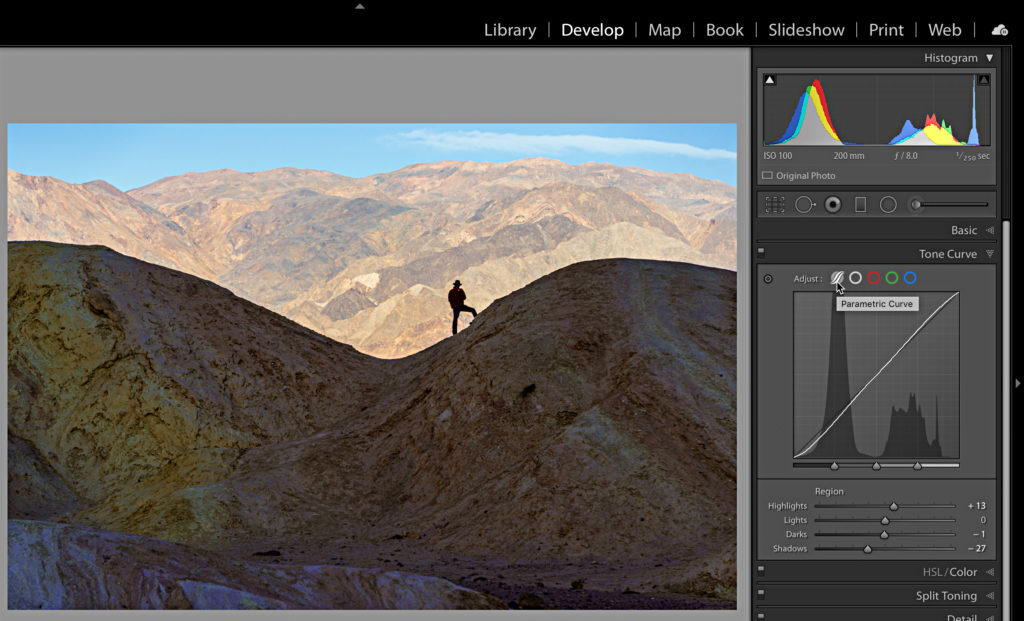
The bigger refresh happened in the Tone Curve panel, which has a whole new look that makes it much easier to switch between the parametric curve and point curve modes. The gray circle with the curvy lines is the button for the parametric curve, and the colored circles represent one of the different point curve mode options with gray being the RGB point curve, and each color representing the curve for that color channel.
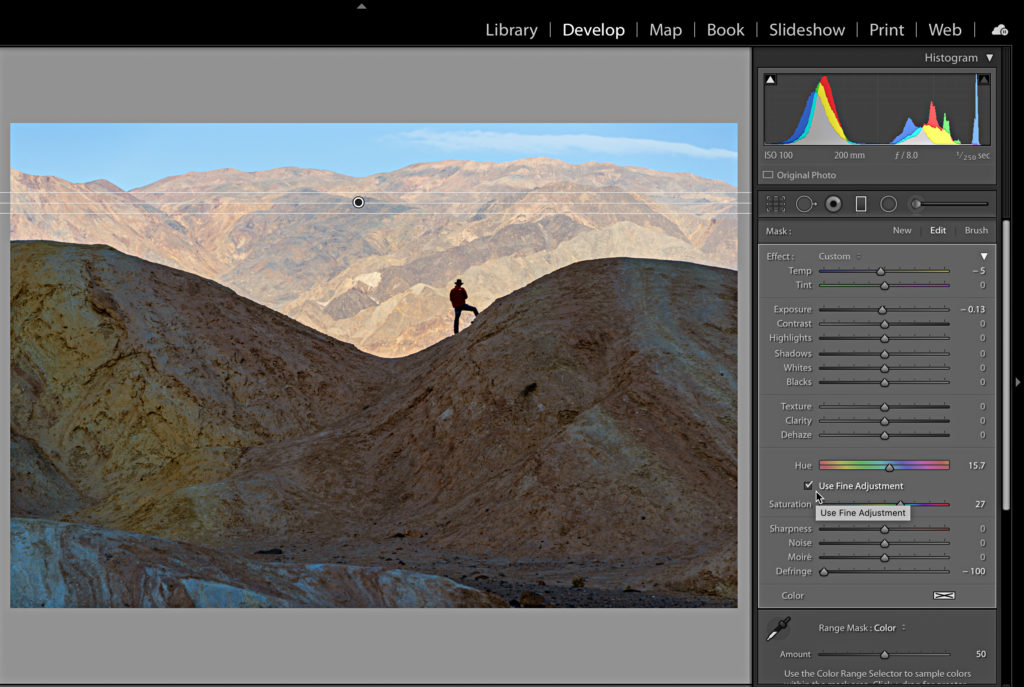
The local adjustment tools (Adjustment Brush, Radial Filter, and Graduated Filter) got the Hue slider added to the roster of available adjustments. This is handy when you want to shift the hue of a color in a localized region of a photo without affecting that same color in other places. For example, let’s say I wanted to shift the hue of the sky in this photo without affecting the blues in the shadows, I could apply a Graduated Filter over the sky, then adjust the Hue slider to a more pleasing color. In addition, I could combine that with an increase in Saturation, a decrease in Exposure to darken that bluer sky down. Because hue shifts are tricky, you may want to combine it with the Range Mask (as I did here to limit the adjustment to just the sky region) for better results. Checking the Use Fine Adjustment box under the Hue adjustment can also prevent wild hue shifts from happening (helpful when working with skin).
Back in February we saw a revamp of the method for customizing your raw defaults, and with that revamp the loss of the ability to customize noise reduction settings based on ISO. This has been remedied in this update. Here’s how it works.
Step One: Select at least two photos with different ISO values (a low ISO and a high ISO based on your shooting style).
Step Two: Adjust the settings in the Detail panel to your liking, along with any other settings you want to include in your preset.
Step Three: Click the + sign in the Preset panel and choose Create Preset.
Step Four: In the New Develop Preset dialog box, only check the boxes for the settings you want to include in your preset, then at the bottom, check the Create ISO adaptive preset box, which is the new feature that will use the settings you applied to adapt the noise reduction settings applied to a photo when using the preset based on that photo’s ISO setting.
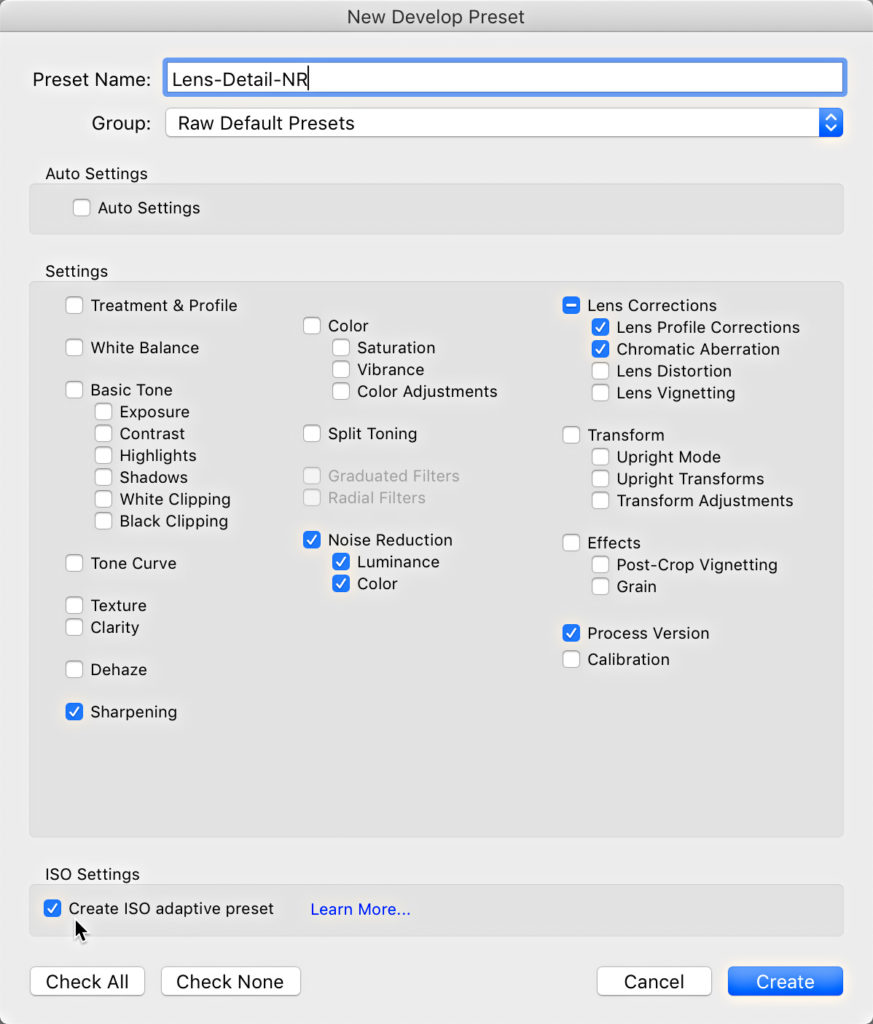
You can get a feel for how this works by exploring the new set of presets included in this release. Expand the Presets panel and note the new Defaults and Optics preset groups. The Defaults group contains 10 new presets, and the ones that end with NR contain adaptive ISO settings. The new Optics group has 3 presets, which contain settings for either removing chromatic aberration, enabling lens correction, or both.
One last addition to the Develop module is a new Centered overlay in the Crop tool.
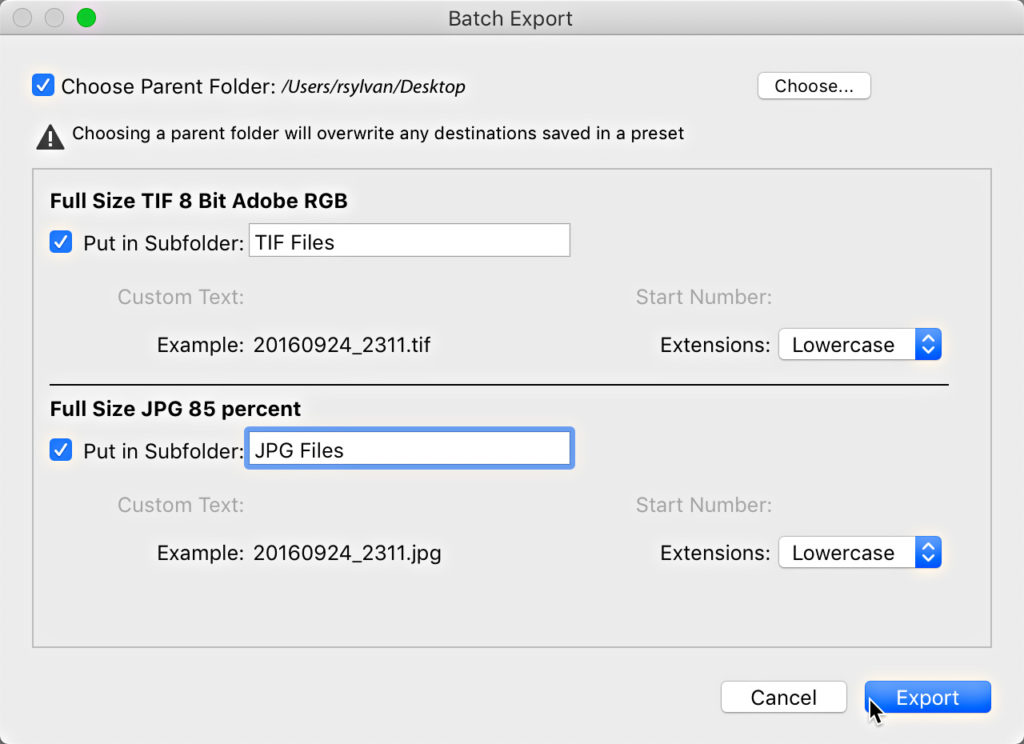
When exporting with more than one export preset selected you’ll notice the Export button has changed to Batch Export (remember, to just use the settings from a single preset you only click the name of the preset). When Batch Export is clicked you’ll be presented with a revamped interface for controlling where the exported copies are saved. For example, I selected two different export presets. One containing settings for exporting JPG copies and the other for exporting TIF copies. After clicking the Batch Export button I’m taken to the new Batch Export dialog box. Here I can opt to check the Choose Parent Folder box if I want to place all exported copies into a single parent folder, or leave it unchecked to send each batch of exported copies to different locations. In my case, I checked Choose Parent Folder with the intention of creating a subfolder for each batch on my desktop.
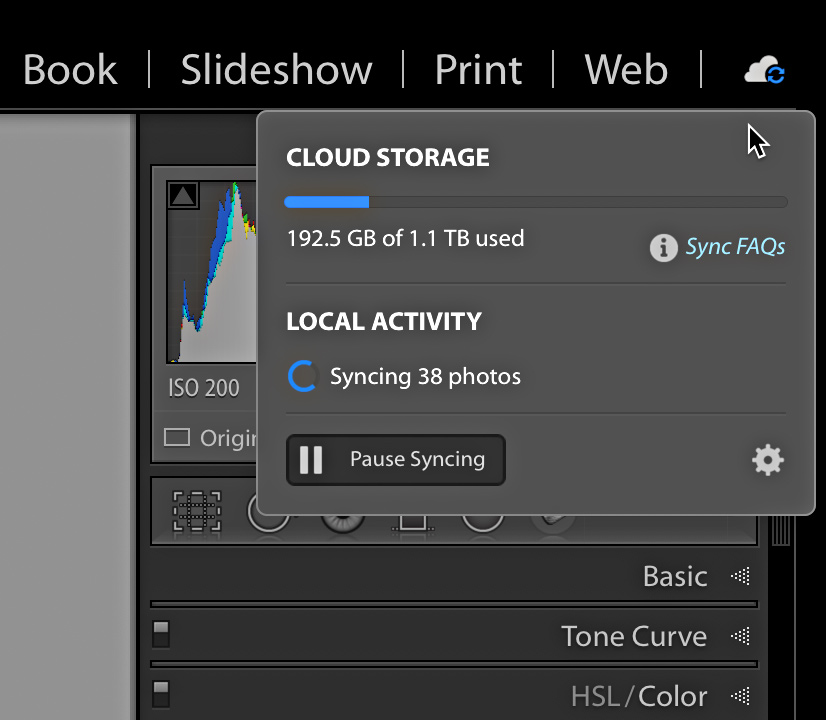
If you sync your Lightroom Classic catalog with the Lightroom cloud you’ll want to know that the sync functions have moved out of the Activity Center and gained a dedicated cloud icon in the upper-right of the interface by the Module picker. Clicking the cloud icon will reveal the status of your storage and any associated activity.
Ok, speaking of the Lightroom cloud, let’s look into what this update brings to the desktop and mobile cloud apps.
Lightroom Cloud Ecosystem
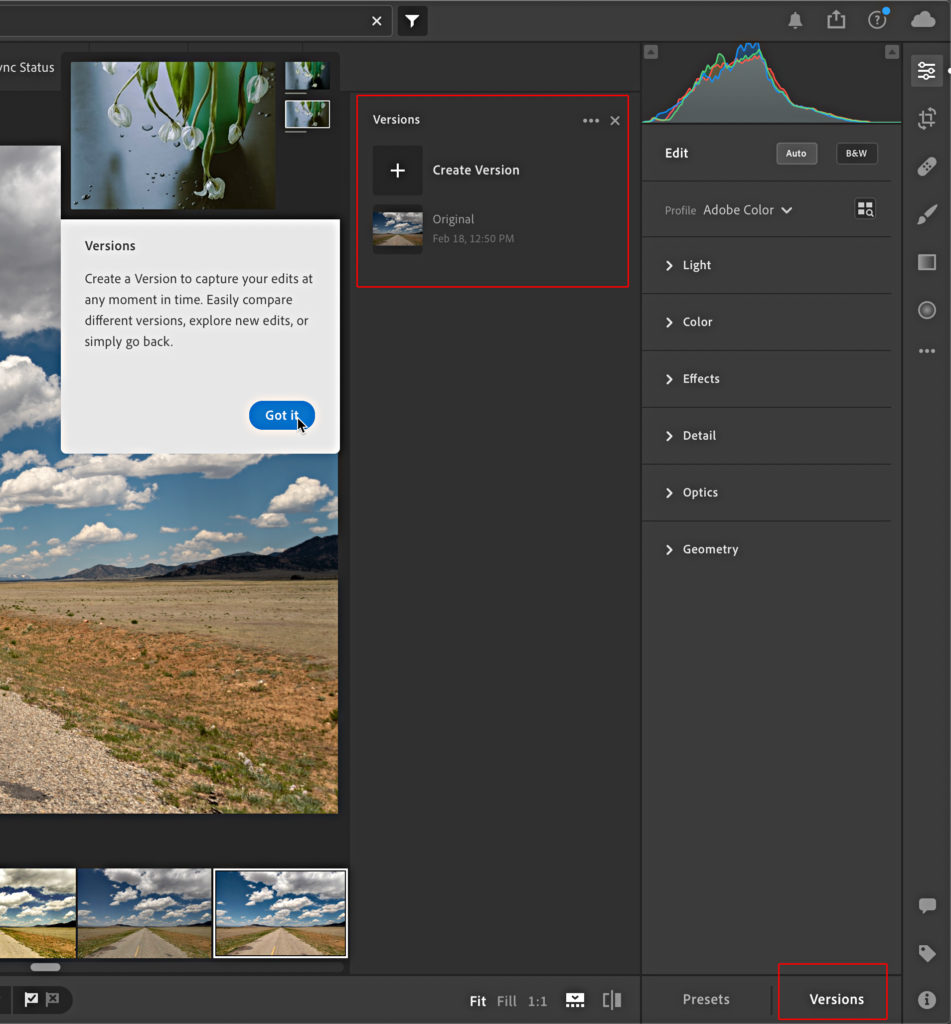
Before looking at a few platform specific additions, I want to point out that all Lightroom cloud apps gained a new feature called Versions. Versions are just like Snapshots in Lightroom Classic, which give you a way preserve an editing state as a version. This way you can easily go back to a previous version, or preserve multiple different editing looks as different versions (such as a color version and a B&W version).
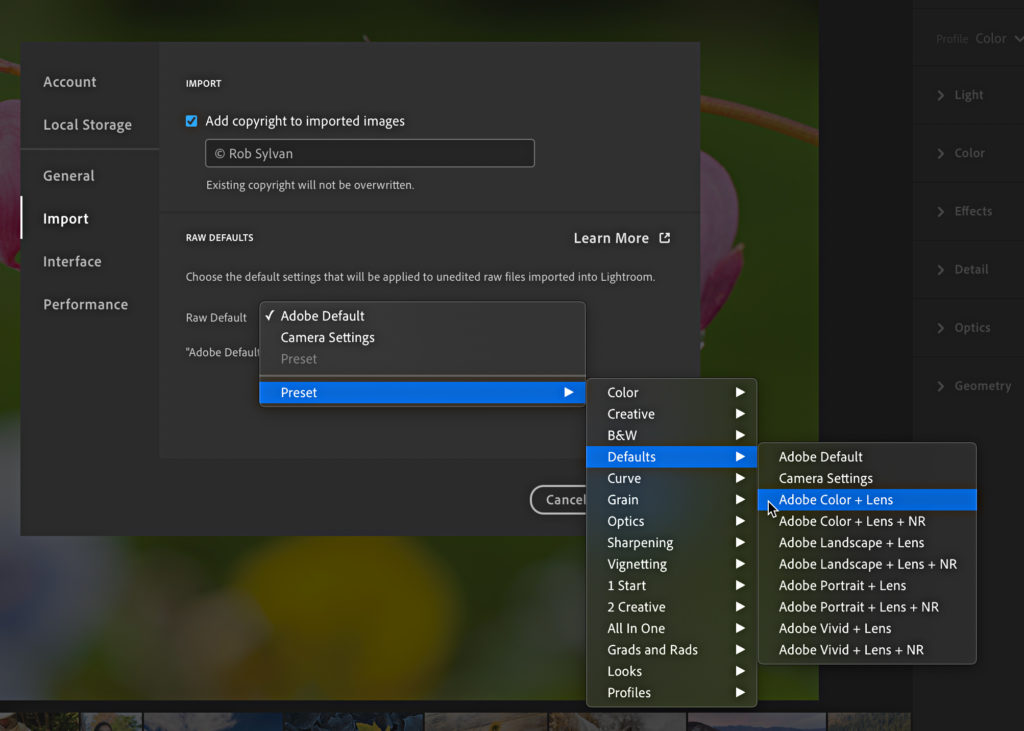
Additionally, just like in Lightroom Classic, the selective adjustment tools in the cloud apps gained the new Hue slider. I hope this means we’ll also see Range Mask added to the cloud in the near future. A version of the Raw Defaults feature used in Lightroom Classic has also made its debut in the cloud apps. Just like within Lightroom Classic, to customize the Raw Defaults you can select a preset containing the settings you want to be applied to all newly imported raw photos. The Lightroom cloud apps also gained a new preset group containing the same new Defaults presets that can be used for this purpose, or you can always create your own preset the way you want it. Go into the Lightroom preferences to the Import tab. Here you will find the new Raw Defaults section, and the menu for selecting the desired preset.
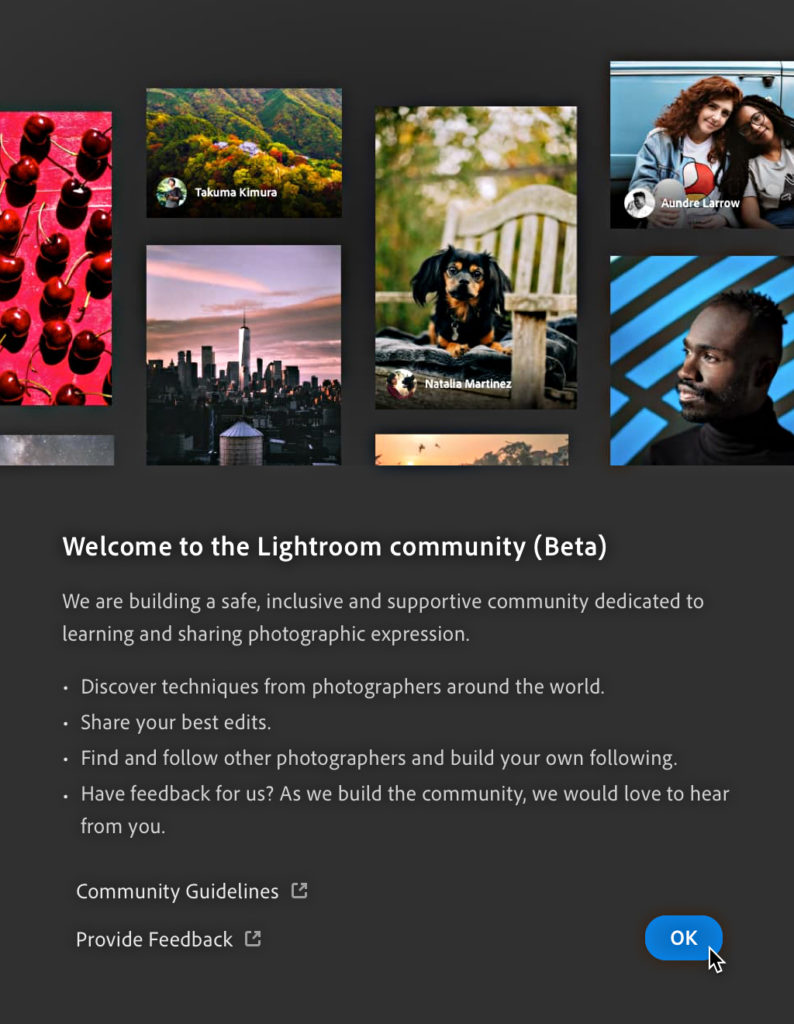
One last thing to mention before looking at platform specific additions is the brand new Lightroom community (currently a beta release). The goal of the Lightroom community is to create a space for discovering other photographers around the world, sharing your best edits, and learning from each other. Head into the Discover section of the Lightroom app to learn more.
Lightroom Cloud for Mac and Windows
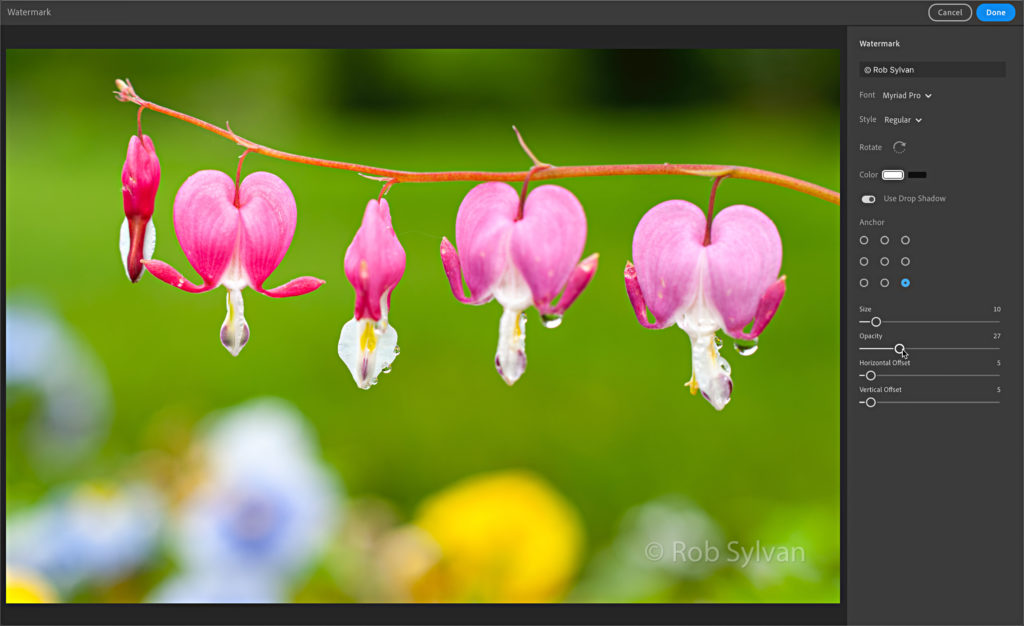
Watermarking has finally been added to the desktop version of the Lightroom app. These watermarks can only be used when exporting copies (hopefully we’ll see this expanded to shared galleries at some point in the future). This first iteration of watermarking is limited to text only. Watermark settings will sync between other Lightroom cloud apps. You can access the watermark settings when exporting copies. Click the gear icon next to the Include Watermark checkbox to enter the watermark editor. Configure your watermark, click Done, and it will be applied to the copy that is created.
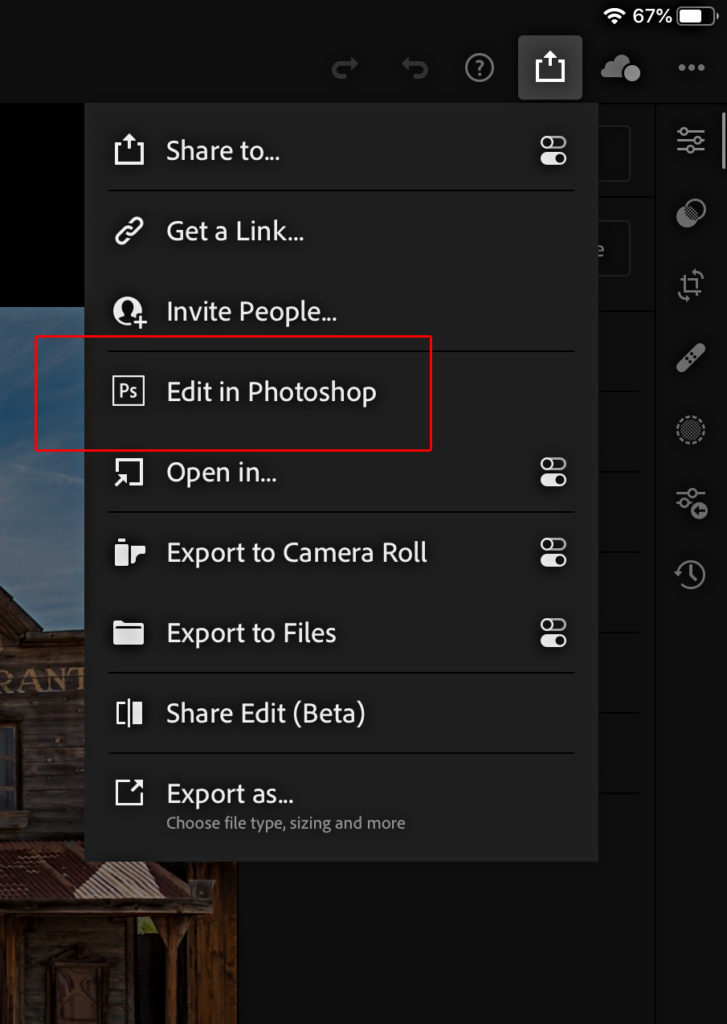
Lightroom for iPad
The long awaited edit in Photoshop (on iPad) has arrived! You’ll need to have installed Photoshop for iPad, and to truly get the most out of this feature you’ll want to have the full resolution photo uploaded to the cloud too. If you only sync from Lightroom Classic then you will only have smart previews in the cloud, and if you use this feature it will prompt you to let you know that the smart preview is being sent to Photoshop. This addition to the iPad workflow should prove to be a boon to getting even more people using Photoshop for iPad.
Well, that’s a lot to take for a spin, so get out there and explore. All of the above-mentioned programs gained support for new cameras as well as new lens profiles. Be sure to visit Adobe’s own announcement (What’s New in Lightroom Classic and What’s New in Lightroom) about the updates to get their take on the release. If you find any issues you can always report them to the Photoshop Community Forum.
The post June 2020 Feature Updates to Lightroom Classic and Lightroom Cloud appeared first on Lightroom Killer Tips.