
Today, Adobe has released an update for the Lightroom and Adobe Camera Raw family of applications. Before getting into the new features that have been added, it is important to note that Adobe has dropped the “CC” from the names of Lightroom Classic CC and Lightroom CC. This is because all versions of Lightroom are now only available via a Creative Cloud subscription, so there is no need to differentiate the CC version from the perpetual license version. One could make the case that having the “CC” on the end did help differentiate between Lightroom Classic and the cloud-based version of Lightroom, but we’ll have to press on and be specific about which version of Lightroom we are using when discussing with others.
From now on, be prepared to see what was called “Lightroom CC” now called just “Lightroom” in general or if referring to one of the applications within the Lightroom ecosystem, you might see “Lightroom Desktop” (Mac and Windows), “Lightroom Mobile” (iOS and Android), “Lightroom Web” (lightroom.adobe.com), or “Lightroom TV” (Apple TV). All of these are part of what is called the Lightroom ecosystem, as they all reference the same pool of photos and edits stored in the cloud. I’m sure this will take some time for all of us to digest and adjust how we refer to these apps.
Adjusting Texture
In what is sure to be one of the most popular aspects of this update, the new Texture control has been added to Lightroom Classic, the cloud-based Lightroom (Windows, Mac, iOS, Android, and ChromeOS), and the Camera Raw plug-in for Photoshop. You’ll find the Texture control in two places. As a global adjustment, Texture can be found in the Basic panel of Lightroom Classic and Adobe Camera Raw, or in the Effects panel in the cloud-based versions of Lightroom.

It has also
been added as a local/selective adjustment to the Graduated Filter, Radial
Filter, and Adjustment Brush tools. In Lightroom Classic there is even a new local
adjustment preset called, “Soften Skin (Lite)” that sets Texture to -35 and
Clarity to -15.
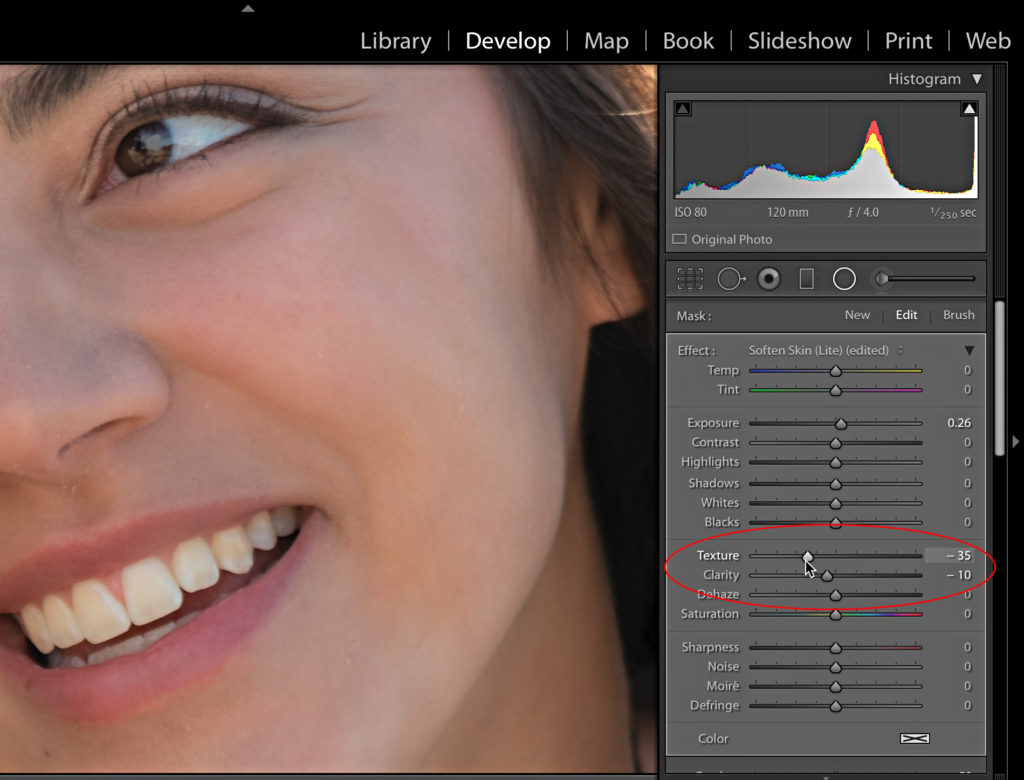
As you might surmise by the name, this control is all about enhancing texture (with a positive Texture value) or reducing the appearance of texture detail (with a negative Texture value).
Texture hones in on medium-sized detail (like the rough surface of the rocks, the jeans, or the leather boots in the first photo) and by doing this can enhance (+) or reduce (-) the appearance of those details with less of an affect on the finer details (like the pores in skin of the second photo) . Experiment with increasing Texture for photos with lots of detail, such as landscape photos, or decreasing texture on portraits. I think you’ll find the greatest level of control using Texture as a local adjustment in conjunction with a Range Mask to further restrict the adjustment to just the area of the photo you want to target.
Edited to add: Max Wendt, the lead engineer on the Texture project, shares some background and detail on the new Texture feature.
Lightroom Classic Only Updates
There are a few updates specific to Lightroom Classic that are worth noting. In regards to tethering, the Canon EOS R is now supported. Adobe also maintains the complete list of tether supported cameras.
There were a
series of under-the-hood updates to various aspects of Lightroom Classic to
improve overall performance. The text engine in the Book, Print, and Slideshow
modules, as well as the Watermark editor has been updated. As has the PDF
exporter in Book and Slideshow. Additionally, the video metadata library and SDK
for Canon tethering were also updated.
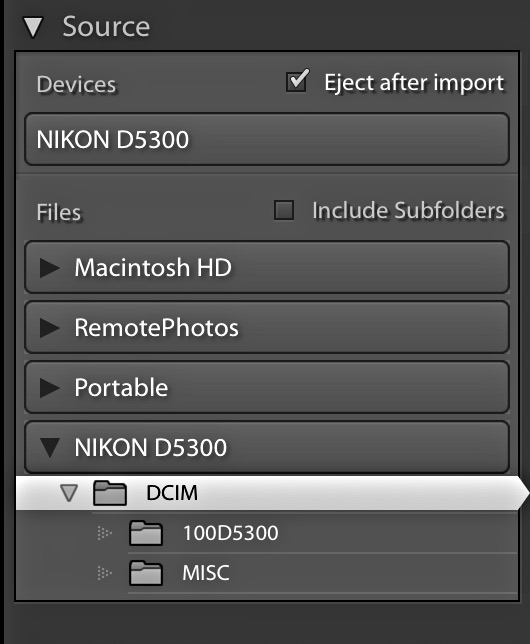
During import
from a memory card you should be aware of a change in behavior in the Sources
panel. Previously, if a memory card was mounted and the Import window launched,
you would see the memory card selected in the Devices section of the Source
panel. However, it was determined that performance was improved if the contents
of the memory card was selected in the Files section of the Source panel (as if
it was just an attached drive instead of a device). Note that the Eject after
import checkbox should still be checked by default even when the folder is
selected in Files. Give it a try and see if that works better on your system
too.
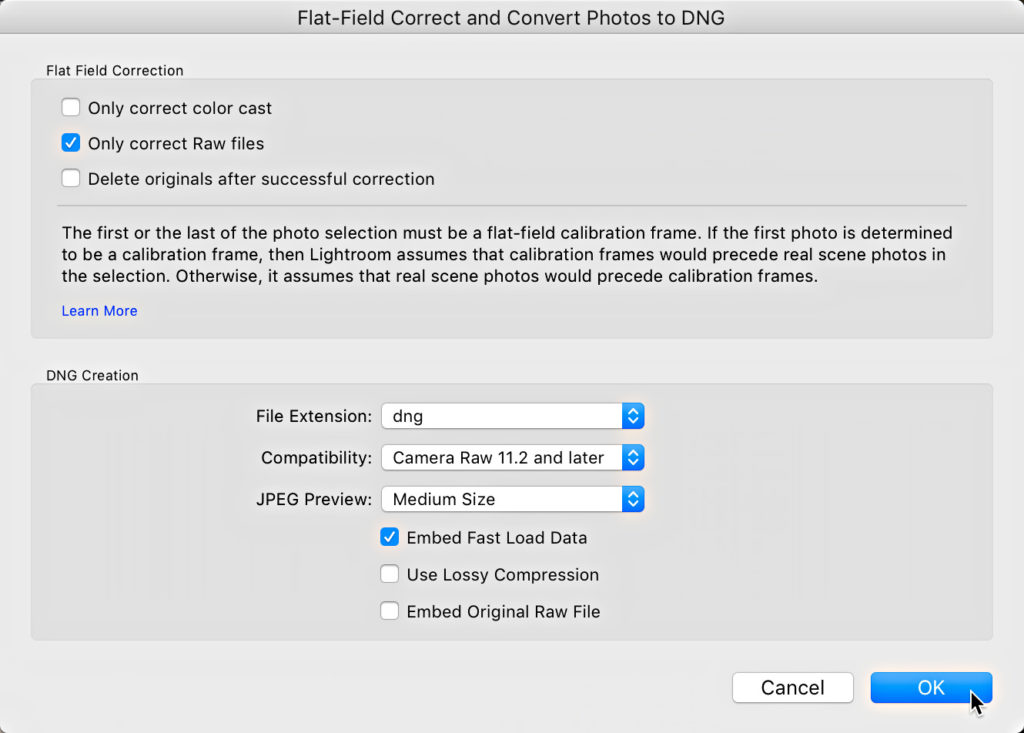
Way back in
Lightroom 4 days there was a little-known plug-in on Adobe Labs called the “Adobe DNG Flat Field plug-in” that was
intended to assist in the correction of an optical phenomenon called “lens
shading” or “lens cast” that more commonly occurs on mirrorless cameras with third-party
lenses or even medium format backs on technical cameras. In those cases where
the sensor is very close to the back of the lens a situation can occur where asymmetrical
vignetting can appear on the photo (and that vignette can also come with a
magenta color cast on the right side and green cast on the left). Well, that
plug-in has been updated and is now built right into the Library module of
Lightroom Classic.
If you have a camera and lens combination that suffers from this problem you can use the new Flat-Field Correction tool to remove the vignetting and color cast. The Flat-Field Correction requires what is called a calibration frame, which is a second photo with the same lighting and lens settings (lens, aperture, focal length, and focusing distance) as the actual photo, but shot through a plastic diffusion card (such as an ExpoDisc® or similar). Then select the calibration frame and the actual photo in the Library module and go to Library > Flat-Field Correction. The tool takes over from there and uses the calibration frame to remove the cast and produce a corrected DNG version of the original photo. Head over to Adobe’s help document on Flat-Field Correction to learn more.
One final note is that the Auto settings function in all of the Lightroom
family applications was also updated to improve overall performance.
Cloud-based Lightroom Updates
Some
additional features were also added to some members of the Lightroom ecosystem
of apps.
Lightroom Mobile (iOS and Android) now have a new Home view that contains some of your most recent photos along with interactive tutorials and inspirational photos. This Home view will eventually get added to Lightroom Desktop too (Windows and Mac). The interactive tutorials provide you direct access to the tutorial photo and then walks you, step-by-step, through each adjustment. I’ve never experienced a tutorial that was more hands-on and interactive than these. While they may benefit beginners the most, I think it can still be a useful exercise to see how other people approach an editing session.

The inspiration section is similar in that we can see what edits have been applied to the photo in question, but it is more from the standpoint of an observer than an interactive edit. Give them a try and you’ll see what I mean. You’ll also notice some familiar instructors like Kristina Sherk, Matt Kloskowski, Terry White, Nicole S. Young, and more, have provided educational and inspirational content in these sections.
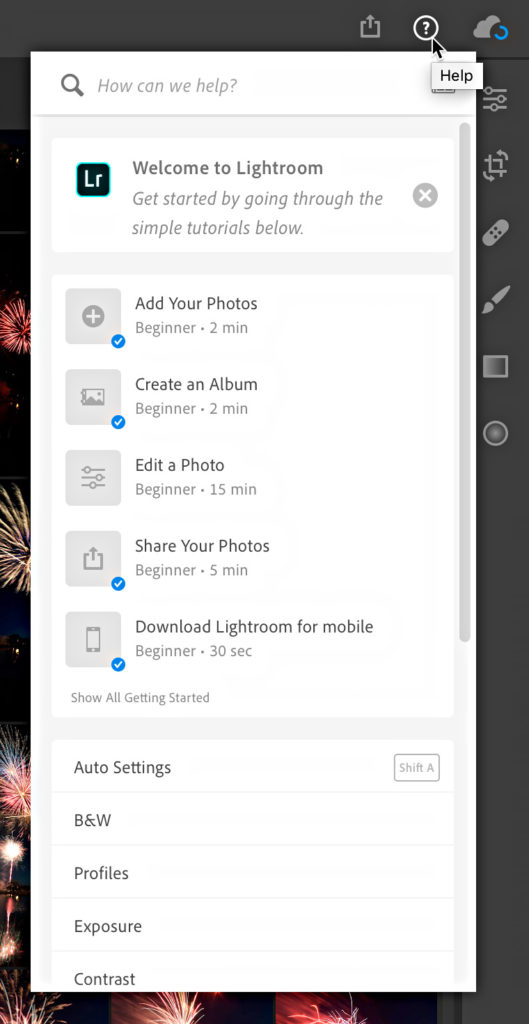
While Lightroom
Desktop (Windows and Mac) doesn’t yet have the new Home view, Adobe did expand
the Help menu (question mark icon in upper-right) to include a search function
and access to built-in tutorials.
All of the
cloud-based Lightroom apps have access to the new Group Album function, where
you can send an invitation to other people that allows them to add photos to
that album (and by extension your catalog). To access this new feature, you
first need to share the album. In Lightroom Desktop, you can right-click an album
and choose Share & Invite where you’ll first need to enable sharing, which
creates a link to that album. From there you can configure your settings on the
Share & Invite screen. In Lightroom Mobile, tap the three-dot menu next to
the album you want to share and tap Share & Invite to access the same
controls on the Share & Invite screen.

From the
Share & Invite screen you can use the Link Access to control access by
invite only or set the album to be viewed by anyone. Use the Invite People
screen to enter the email addresses of the people you want to invite to the
album, or you can enable Allow Access Request from the Link Settings screen and
simply share the generated link with people instead of having to enter everyone’s
email address individually.
As with each update, there is also additional support for the raw files from new cameras and new lenses. Adobe also keeps a running list of all updates, known issues, and bug fixes that is worth checking out.
Remember, the
updates tend to roll out gradually to all customers, so if you don’t see the
update right way, check back later on.
The post May 2019 Update for Lightroom Classic, Lightroom, and Adobe Camera Raw appeared first on Lightroom Killer Tips.