
Last week we talked about one of the big reasons I jump over to Photoshop from Lightroom: to remove unwanted “stuff” in my photo, and we went over Photoshop’s very awesome Clone Stamp tool. The week before that we looked at the Healing Brush and its cousin the Patch tool, but today we’re going to look at which to use and when, because each has certain characteristics that make it suited for certain kinds of tasks (which is a fancy way of saying, sometimes one works better; sometimes the other works better).
First, a reminder of what the two tools do:
- The Clone Stamp tool makes an exact copy of an area you choose, and then you paint that area over the thing you want to remove from your photo. Think of it as “painting a copy.”
2. The Healing Brush also uses an area you choose but as a general “use this type of tone and texture” where it works its magic. So the result isn’t an exact duplicate, but more of a repair that’s influenced by the area you choose. There are actually two Healing Brushes. If you use the Spot Healing Brush, Photoshop automatically chooses the area it thinks has the proper tone and texture, and it’s sometimes way off with where it chooses, so the results can be really bad. With the regular Healing Brush, it relies on you to choose the proper area from which to “sample,” and that usually works out really well.
So you might be thinking, “Well, it sounds like you’d always want to use the Healing Brush, as the fix looks less obvious because it’s not making a straight duplicate, plus you have two brushes to choose from, and a third if you count the Patch tool (which is for healing larger areas or objects).” And all that would be right on the money, but the Healing Brush has an Achilles heel (see what I did there?) in that it works best when the object you want to remove is all by itself, such as a speck, spot, smudge, telephone wire, or a can lying in the grass—something that’s kind of all by
itself. It usually messes up when the thing you want to remove is touching another foreground object, because it can often pick up areas of that other object, smearing the edge of the repair, and that’s a dead giveaway that the image has been retouched.

REMOVING SPOTS
We’ll do a project here that will make a big difference in your understanding of which tool to use and when. Open an image with some spots or specks in it (in this case, we’re using an image I took in Dubai a few years back of the amazing Burj Al Arab hotel). I had tons of sensor dust and specks from shooting out in the desert for days, but these spots are all by themselves, sitting on a background of the sky, which makes them easy for the Healing Brush or Spot Healing Brush to remove. In fact, this is their “jam.” It’s what these tools do best, and it’s easy and seamless for them to remove those spots.

Here’s the same image after just 60 seconds or so with the Spot Healing Brush (J). You just make your brush size a little larger than the spot you want to remove, click once, and it’s gone. You can see, even with all those spots, it only takes a few clicks to quickly clean up the sky. By the way, to change your brush size, use the Bracket keys ( [ ] ) on your keyboard (they’re to the right of the letter P on a standard US keyboard). Pressing the Left Bracket makes the brush smaller, and the Right Bracket makes it larger.

GETTING MESSY WITH THE HEALING BRUSH
Now, here’s where it gets sticky. I zoomed way in, up near the top of the building on the left side, and there’s a part of the building sticking out. It’s an observation deck and lounge (if I remember correctly, as it’s been a few years). That deck is touching the side of the building, so this is where it gets messy.
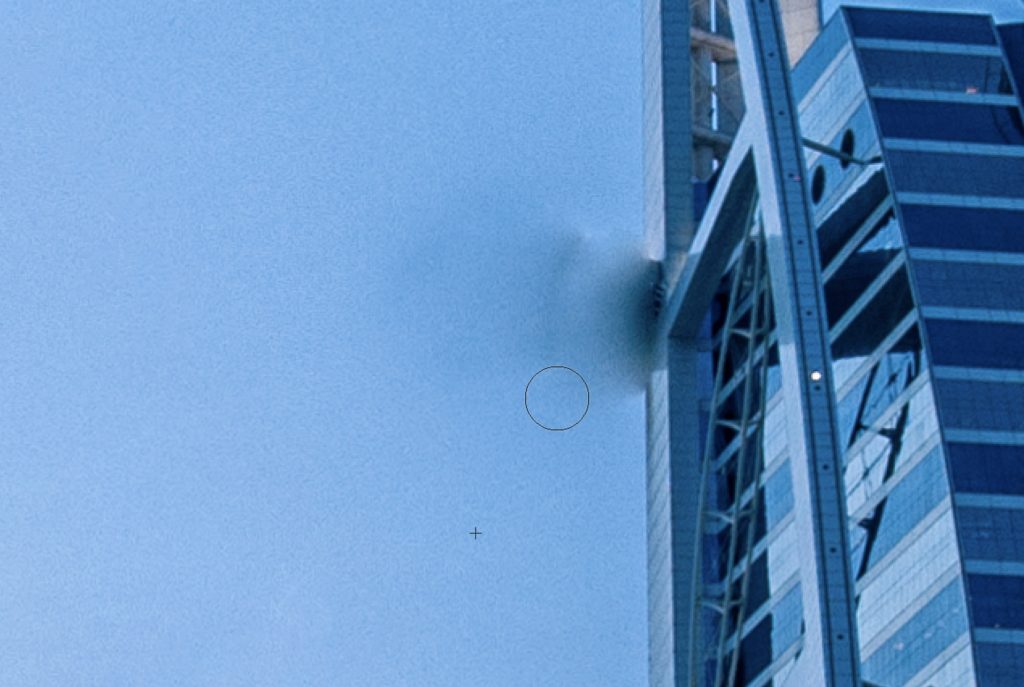
Let’s try using the Healing Brush (nested below the Spot Healing Brush in the Toolbar) to remove that observation deck sticking out from the building. We Option-clicked (PC: Alt-clicked) to choose the area we wanted to sample, and then painted over the area we wanted to remove. Now you can really see the issue with using the Healing Brush to remove something when it’s touching the edge of something else. It literally smears—a bad look all the way around—but that’s okay; that’s why we have the Clone Stamp tool; for cases like this where the Healing Brush just isn’t the right tool for the job.
KEEP IT CLEAN WITH THE CLONE STAMP TOOL
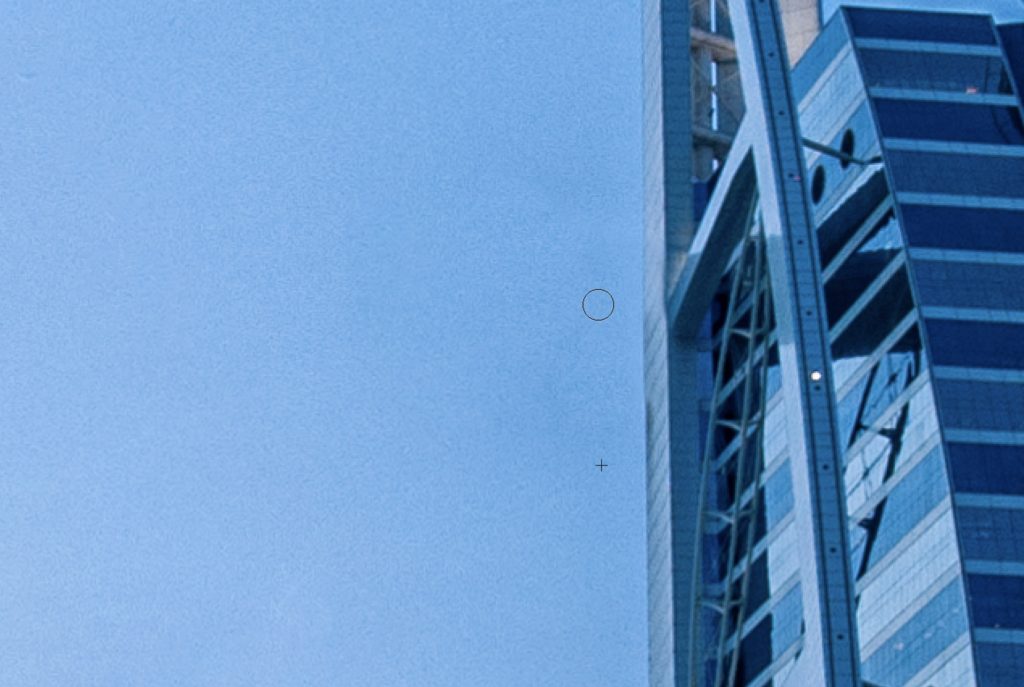
Let’s press Command-Z (PC: Ctrl-Z) to Undo, so the observation deck comes back. Now we’ll get the Clone Stamp tool (S), hold the Option (PC: Alt) key, and click once in an area nearby with similar tones and texture (here I clicked it right below the observation deck). Now when we paint over the deck, we’re painting the area of sky right on top of it. We’re “cloning” the sky over it. When we get near the edge of the building, we’ll sample the edge of the building (hold Option [PC: Alt] and click) and paint right along the edge to clone the building over the remaining piece of the observation deck. What makes this easy is that you’ll see a preview of the area you sampled right inside your brush cursor, so lining it up with the edge of the building as we painted was a snap in this case. Just a few seconds of cloning and that deck is gone but without the smearing. Now, if there are any specks, spots, or missed areas leftover in the sky, we can switch to the Spot Healing Brush or Healing Brush to quickly clean up those.
USING THE TOOLS TOGETHER FOR FAST, CLEAN EDITS

Okay, now I’m going to share one of my favorite tricks where you only have to do a little bit of cloning and then you let the Patch tool (the Healing Brushes’ bigger cousin) take over to do the heavy lifting. Remember what I said earlier: the Healing Brush smears when the object you’re trying to remove is touching another object (like what we have here). But what if we first cloned over the part of the deck that’s touching the main building with the edge of the building and sky? Since no part of the deck is touching the building now, we could switch to the Patch tool and remove the rest of the observation deck in just seconds.
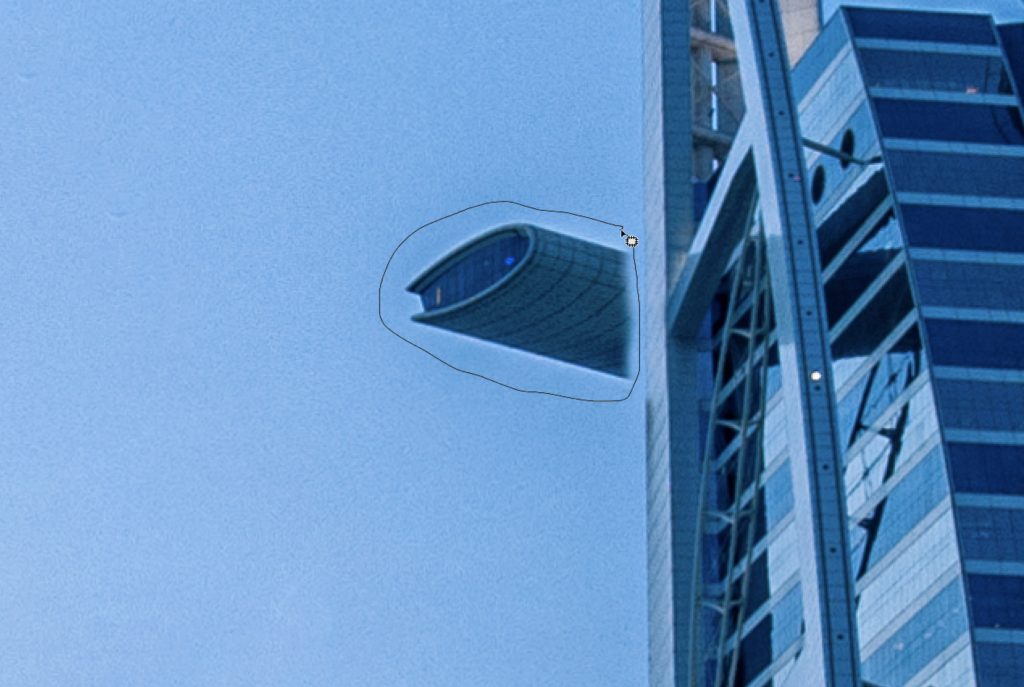
We did this by first getting the Clone Stamp tool; Option-clicking (PC: Alt-clicking) right on the edge of the building, directly above the observation deck, to sample that area; and cloning straight down that wall. See how it created a gap between the deck and the building? That’s what we’re after. That separation. That little gap.
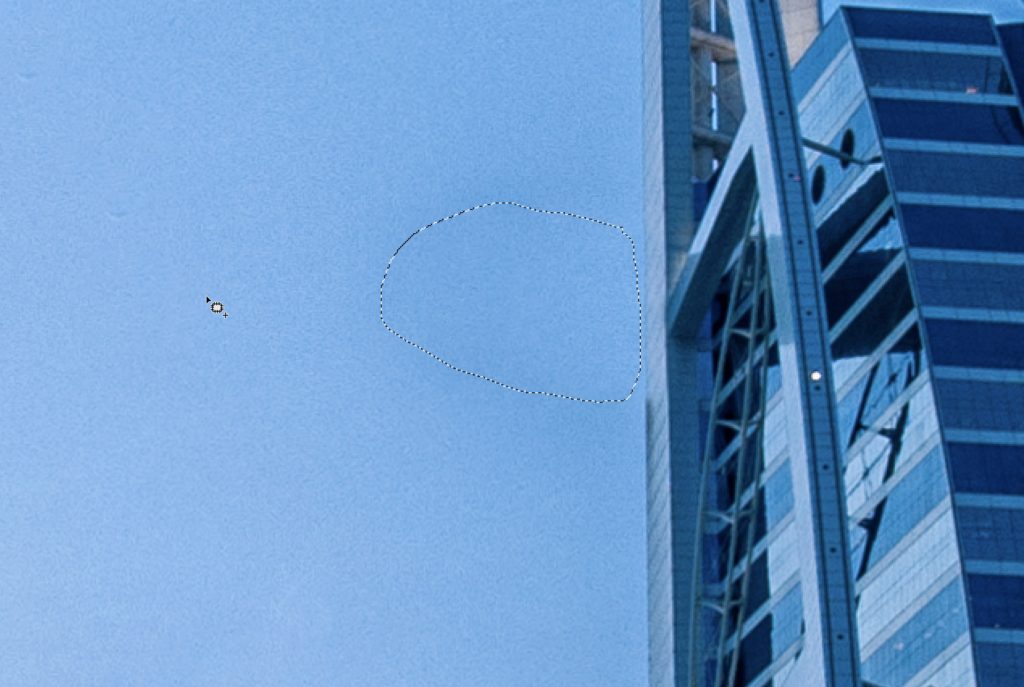
Now we switched to the Patch tool (nested below the Spot Healing Brush Tool in the Toolbar) and dragged out a selection around the floating observation deck (it’s not touching the edge of anything at this point, right?), as shown here.
The final step was to simply take the Patch tool, click-and-hold the cursor inside that selected area, and drag it over to the left until that observation deck was gone. When we released the mouse button, our retouch was complete. This is a great way to use the two tools together to get rid of those harder-to-remove areas.
Okay, next week our journey continues, but I hope you found this helpful and that it gives you an idea of how powerful these tools are when you use them together, each doing the part of the retouch it does best.
Here’s wishing you a better-than-average Tuesday! 
-Scott
P.S. Our Two-day Lightroom Conference official kicks off today – it’s not too late to join (and you get the entire conference archived for an entire year, so if you miss any of the 20+ sessions, you can catch them, or rewatch them, etc.). Get your ticket (and full conference schedule) right here.
The post Photoshop For Lightroom Users – Part 4: The Healing Brush vs. The Clone Stamp Tool appeared first on Lightroom Killer Tips.