
How to Change the focus of a photo in Photoshop
We will Use Depth Blur to add a shallow depth of field, bokeh effect. Output as a depth map and then touch up the depth map. Apply lens blur for a very realistic depth blur effect.
Download and Open the image of the train. (This is a free photo from Adobe Stock) The photo is sharp everywhere. We are going to change it, to add a shallow depth of field effect.

Choose Filter>Neural Filters
Choose Depth Blur, you will see the background becomes blurry.
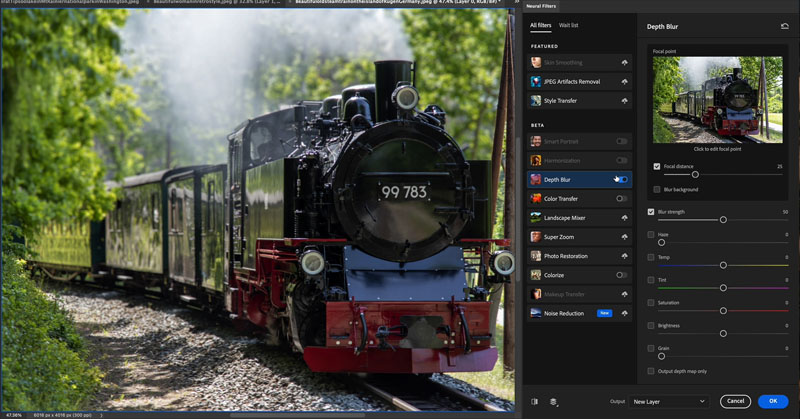
Click on the background in the thumbnail on the right
Notice the train becomes blurry and the background sharp.

Click on the front of the train in the thumbnail.
It looks pretty realistic. Except the areas between the poles on the right got missed.
The challenge with AI based, blurring, is sometimes little parts get missed.

Let’s take control of the blur.
At the bottom, click Output as Depth map only. The preview image will turn into a grayscale Depth Map.
Click ok.

We now have a grayscale depth map that we can use to focus the blur.
The darker areas tell the software, they are closer to the camera and should be sharp. The lighter areas should be more blurred.

Hide the top layer and click on the bottom layer

Choose the quick Selection tool.

Use the quick selection to select the areas in between the poles.
Tip: Hold down the alt/option key and use Quick selection to subtract from the selection.

With the selection active, turn the top layer back on and make sure it’s the active layer.

Grab a paint brush.
Hold alt/Option and click to sample colors.
Sample the light tone and paint it into the selection.

Notice, I painted 3 tones into the selection, so that it matches the rest of the image in the depth map. Press Cmd/Ctrl+D to deselect

We are going to make a channel from the depth map, so we can use it.
Open the Channels panel. Window>Channels
Drag the red channel into the Plus icon to duplicate it.
Its called Red Copy and it’s an alpha channel.

If you want, change the name of the channel by double clicking on the name and typing. I renamed it DM, for Depth map. The names have no purpose, other than making it easy for you to identify the alpha channels.
Click on the name RGB to reselect the RGB channels, the DM channel should be hidden.

Hide the depth map layer.
Duplicate the background if you want, just as a best practice, to preserve the original layer.

Choose Filter>Blur Lens Blur
You will see a Depth Map option. Change source to DM, if it isn’t already selected.

We can now use this depth map channel to blur the image.
Choose the cross hairs. (Set focal point)

Click on the area of the photo that you want to be sharp. Adjust the amount of blur to blur the background.
Here is our very realistic result.

I hope you found this tutorial useful, check out the other hundreds of tutorials here at PhotoshopCAFE.
ciao
Colin
I’ve got a whole bag of goodies you can have for free at the Vault. Grab free goodies here, including Photoshop brushes, actions, presets, sky images, ebooks and a whole bunch more.
Consider Consider joining our mailing list so you don’t miss any of my tutorials.
For more, follow us on Social Media
The post How to Change the focus of a photo in Photoshop, use Depth Maps for depth of field blur appeared first on PhotoshopCAFE.