Every year around the time of Adobe MAX, we get a big update in all the CC apps and Photoshop is no exception. Adobe drops quarterly updates, but the MAX one is always the biggest. Worth note, in the Photoshop naming game, (Photoshop (version), then Photoshop (CS), then Photoshop (Extended and standard), to Photoshop CC, to Photoshop CC (year), (Not counting all the spin-offs – Photoshop LE, Photoshop Elements, Photoshop Lightroom, Photoshop Mobile, Photoshop Lightroom Mobile and the other siblings). it’s now just called Photoshop 2020, not Photoshop CC 2020. No, that doesn’t mean that it will be going back to perpetual boxes, the subscription is here to stay. This year it’s a big release and there are some great features. Let’s look at them now.
Photoshop 2020 Superguide
- Advanced Warp (Warping a dinosaur and shadow)
- New Presets panels, (Using gradients to colorize an image)
- Photoshop on iPad
Presets improvements
After many years, Photoshop has finally updated the presets. Gradients, patterns, swatches, layer styles and shapes have all received new library content. Don’t worry, if you love that bubble pattern, all the old presets are still available under “legacy”. These items have all been moved from the preset manager, to Photoshop Panels. If you remember how brushes and swatches were reorganized into groups, you now have this functionality with the new preset panels. Tip: Cmd/Ctrl+Click on subfolders to expand/Collapre them all at once. Gradients are now available as Library items.

The big feature though is being able to change the presets with a single click. You can drag from the panels into the document to apply. If there is a selection, they will be masked to the selection, otherwise they will appear as adjustment layers. You can also drag them directly into the layers panel. Now you can click on different preset to swap with single click.
See Tutorial on the new Gradient panel here
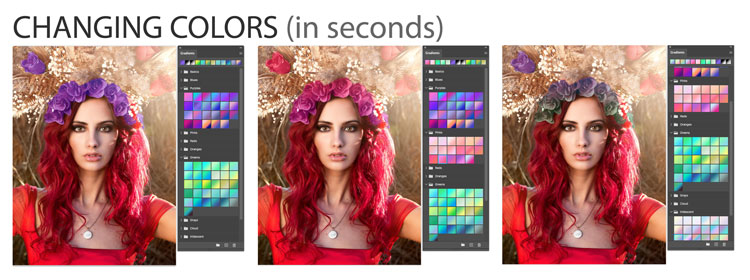
Admittedly some of the more useful items I was hoping for, such as social media icons and UI elements are missing from the new presets (how to make you own) , they are an improvement over what we had before. (The 90’s called asking for their presets back).
Object Selection Tool
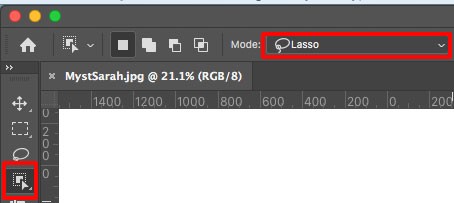
The Object Selection tool is very exciting. It comes in 2 flavors, rectangle and lasso. This amazing tool enables you to drag over and object in a photo or image and then Photoshop magically selects it for you, like Select Subject, but more focused. You could select it with the rectangle and then fine tune with the Lasso option. As always Shift Adds to the selection, while Alt/Option subtracts. This is like a Magic wand and Magnetic lasso in one, but its powered by Sensei, Adobe’s AI engine. Worth noting, the Select Subject AI has also been updated and works much better now. You can also find Object Selection in Select and mask.
See full tutorial on Object Selection here

Enhanced Transform Warp
This is one of my favorite new features in Photoshop 2020. It’s now easier than ever to warp the shapes of objects or wrap textures on to them. With a layer active, Choose Edit>Transform>Warp or press Cmd/Ctrl+T for Free transform and right click and choose warp. Once warp comes up you can choose a grid from the Tool options bar.
The best part is this, if you hold down alt/Option and drag on the grid, you can split the mesh wherever you wish. This enables you to do custom splits.
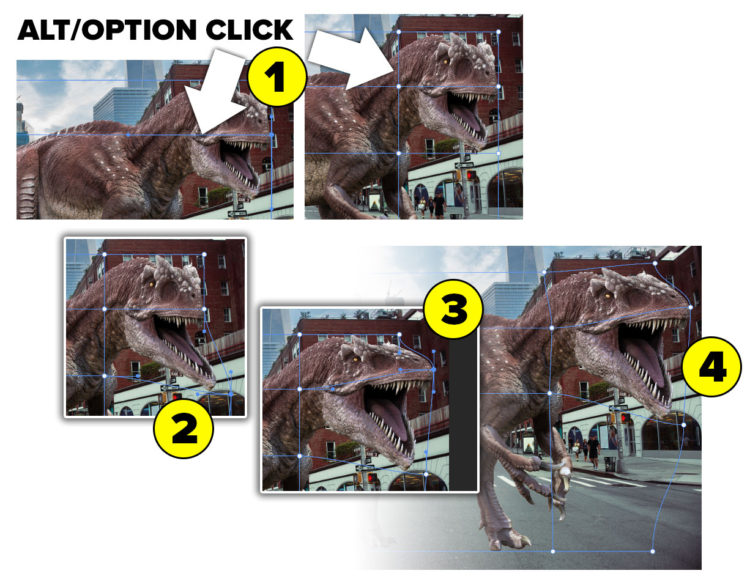
Here are a couple of fun things I have been playing with the test the warp.


As far as warping, it reminds me of working with 3D modelling. With 3D you have points, vertices and surfaces. Same here, you can drag on the surfaces to warp, or select points and drag. You can also choose the Bezier handles once you click a point.
If you hold down Shift, you can select multiple points and move sections together. With multiple selected points you will see a selection box. Move your curser to the edge to see a little arrow. You can use this to pinch or bloat the points.
Smart Objects to Layers
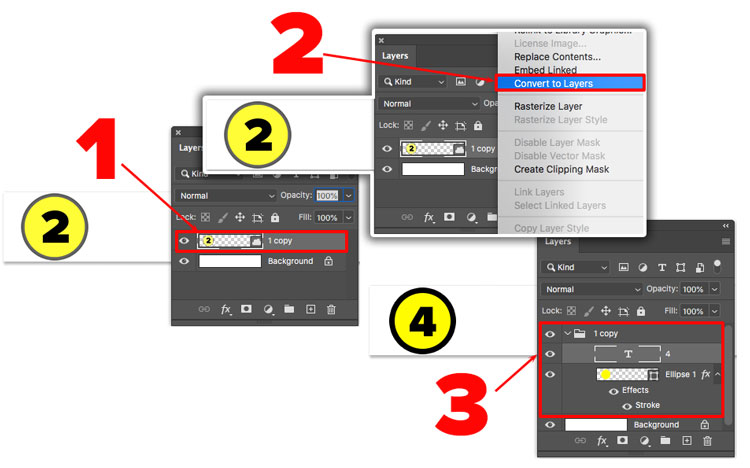
This is one we have been waiting a while for. Previously if you wanted to make layers from a Smart Object, you had to open the Smart Object in a new window and then drag the layers back to the main document. A use case is making derivative items, where all the layers are the same on each except for one or 2 things such as numbering bullets.
Now all you need to do is Right Click on the Smart Object and choose Convert to Layers. If there are multiple layers in the Smart Object, they will be converted to a Layer Group.
Custom Content Aware Fill
The last big update of Photoshop added some much needed features in Content Aware Fill. This is the tech that magically fill in area that we select with pixel similar to the surrounding area. I did an in-depth tutorial on that here https://photoshopcafe.com/content-aware-fill-photoshop-cc-2019-remove-anything-photo/
One thing that was missing was an invert button, so that you could start with nothing and paint on the areas to be used in the sample. Adobe went one better.
We now have 3 modes, rectangle, which is the old default, auto which often does a better job that rectangle and now we have Custom. Custom allows you to paint on the image an only the painted areas will be used. As before, you have to access this through the menu Edit>Content Aware Fill
Consistent Transform
In the past you scaled something by dragging, and to constrain you held down the Shift key. Then last year a “small” change to the way we transformed happened. Just like every other program on earth, scaling was constrained (staying in proportion) by default and you now hold down the Shift key to squish or scale non proportionally. Wow, what a huge outcry from the constrain and the non-constrain community. Proof that change doesn’t come easy. Now we have the best of both world with a link at the top tool bar to constrain or not.
Here’s the thing, that link has always been there, but it wasn’t attached to the on screen scaling before. Brilliant! Hidden, but mighty.
![]()
Super Properties Panel
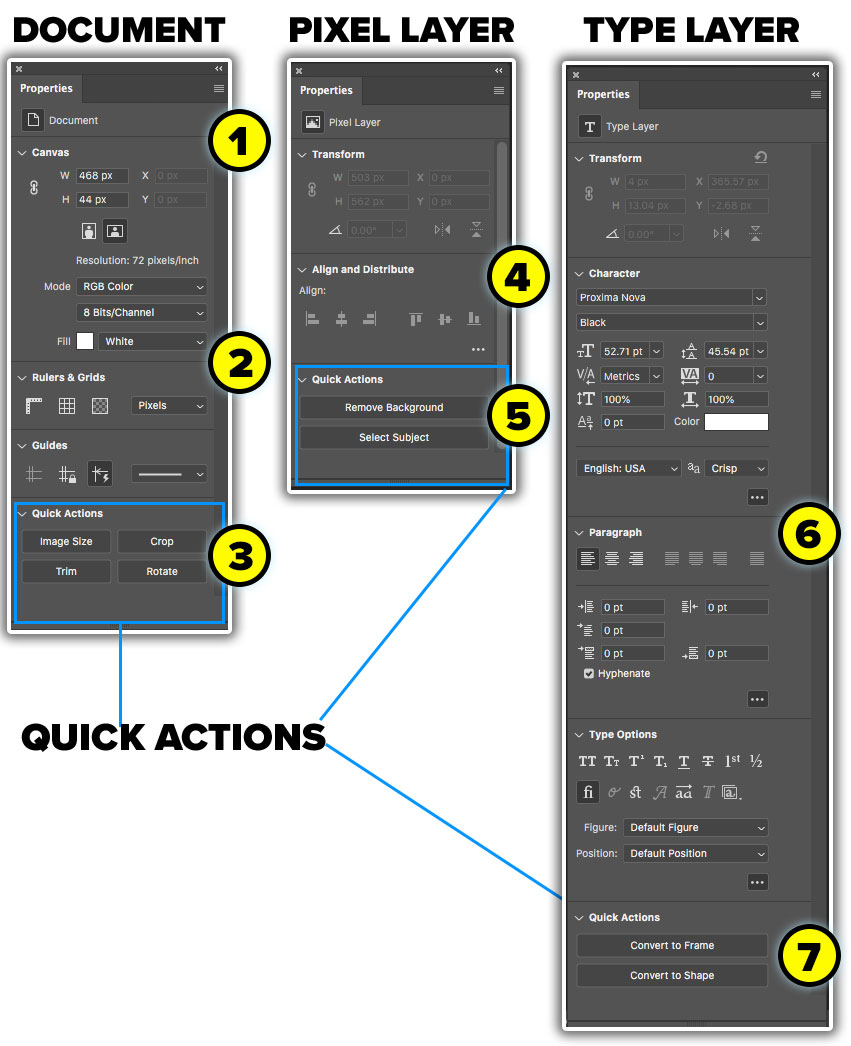
The properties panel has undergone an overhaul and has now become your command center. There are 3 areas that have been beefed up with lots of new options. Document Properties, Layer Properties and Text. With these new additions, you can do a lot more without going through other menus or panels. This also makes it possible to work more in full screen mode. Also check out the cool things in Quick actions (press the button for things to happen).
Document properties
- Canvas: Dynamically change canvas size and orientation by typing in new size
- Rulers, Grids + Guides
- Quick Actions, Image size and trim are especially useful to me
Pixel Layers
- The ability to Flip and rotate in a single click is great.
Easy access to Align and distribute are nice, although these are also in the toolbar, but would be otherwise hidden in Full screen mode.
- Select subject and remove background are sure to create some buzz. This is something out of SciFi, click remove background to select, extract and move the subject to a new layer in a single click.
LET ME SAY THAT IN ALL CAPS SO YOU DON’T MISS IT: REMOVE BACKGROUND.
Properties panel
- All the text options for the Character and Paragraph panels are here. Click the ellipsis to expand and see all options.
- Quick actions to convert text to a frame or Shape
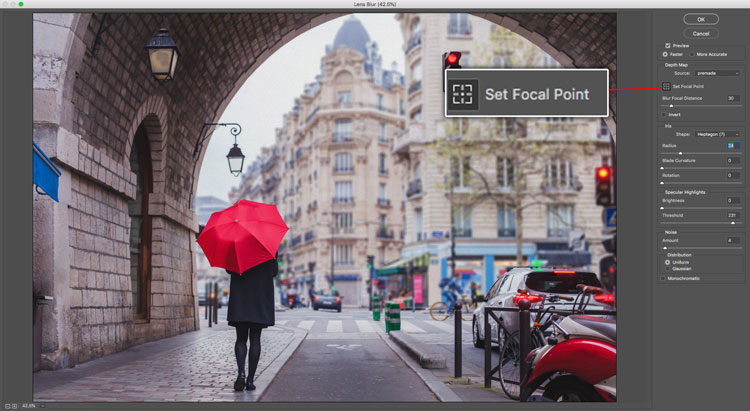
Lens blur
Lens blur is not new and I have done tutorials on it before. This time around they have added a Set Focal Point button. If you have a depth map, you can click on the image to focus where you click. You can use the depth map from a portrait mode photo from a mobile camera such as iPhone or Pixel in HEIC/HEIF format. Or you can create your own depth map.
See the tutorial here on how to work with depth maps for Blurring background
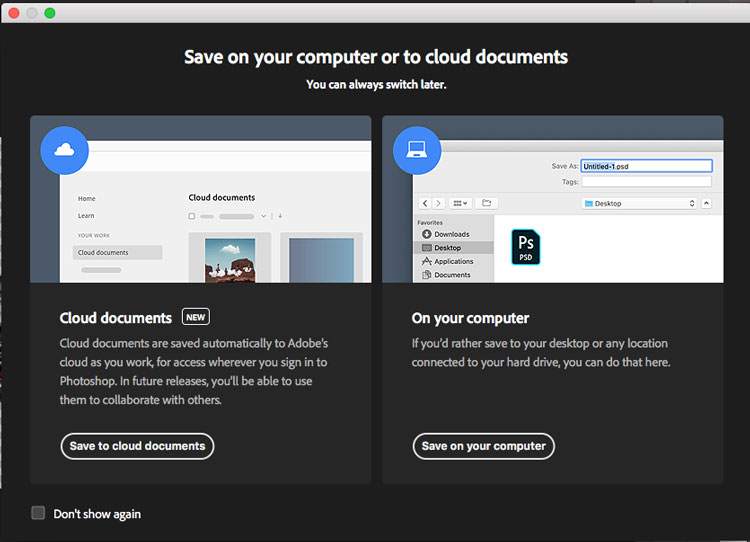
Cloud Docs
When you choose Save, you now have the open to save your file to your local drive just like you always did, but there is an additional Cloud photo option. This enables you to save images in Creative Cloud for access anywhere. This is entirely up to you, you can choose where you want to save them and set that as the default location and change it anytime you like. Just to clarify, Adobe is not forcing you to save images to the cloud, they are just making that option available if you want it. The big reason this option has been added is the forecoming Photoshop on the iPad. This will be an easy way to share images between iPad and desktop.
Import from iPad or iPhone
This feature is only on the Mac, but you can import an image directly from and iPhone or iPad. Just plug the device in and choose File>Import>Images from device. Navigate to your device on the left and choose the images you want to import.
JDI’s (Just Do It.)
JDI has been a thing in Photoshop for a while now. They are the little common sense tweaks that make everyday tasks easier. Here is the line up for Photoshop 2020.
- When you are painting with a brush, Hold Tilde key (squiggly thing under the escape key) to switch to erase
- Keyboard shortcut to rotate brush. YAY! Use arrow keys to rotate the brush. Holding down Shift rotates by 15 degrees each time. Double click tool bar to reset
- Right click on the document tab and choose Close others to close all the Windows except the one you are currently working in. Or use Ctrl+Alt+P
- Zoom to layer Content: Hold Alt/Option key and single click thumbnail in the layers panel. Photoshop zooms to fill the screen with that layer.
- When you save an animated gif it now supports all frames instead of reducing it to a single image.
I hope you enjoyed this tutorial. Don’t forget to check out my other Photoshop 2020 tutorials here on PhotoshopCAFE
- New Feature overview (All the new features in Photoshop 2020)
- New Presets panels, (Using gradients to colorize an image)
Great to see you here at the CAFE.
Colin
Check out all out other super guides here
The post Photoshop 2020 Upgrade: New Features and how to use them appeared first on PhotoshopCAFE.
