
Preparation: Making a new pattern
We will use a plaid (tartan) pattern.
Open your pattern
1. Choose >edit>define pattern
2. Give it a name. Thats it!
It appears in the Patterns which you will see in the next step.

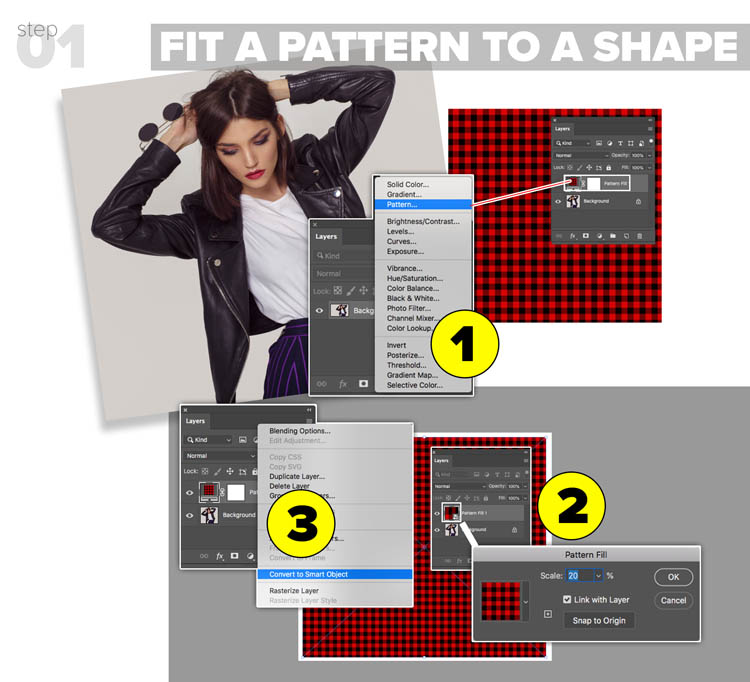
Step 1. PLACING PATTERN
1. Choose the Adjustment layer icon in the Layers panel and choose Pattern, choose the pattern you want to use.
2. Double click the pattern in the layers panel to open the Pattern Fill box. Change the Scale to 20%
3. Right Click on the layer name and choose Convert To Smart Object. This will enable us to do some pretty amazing things later on.
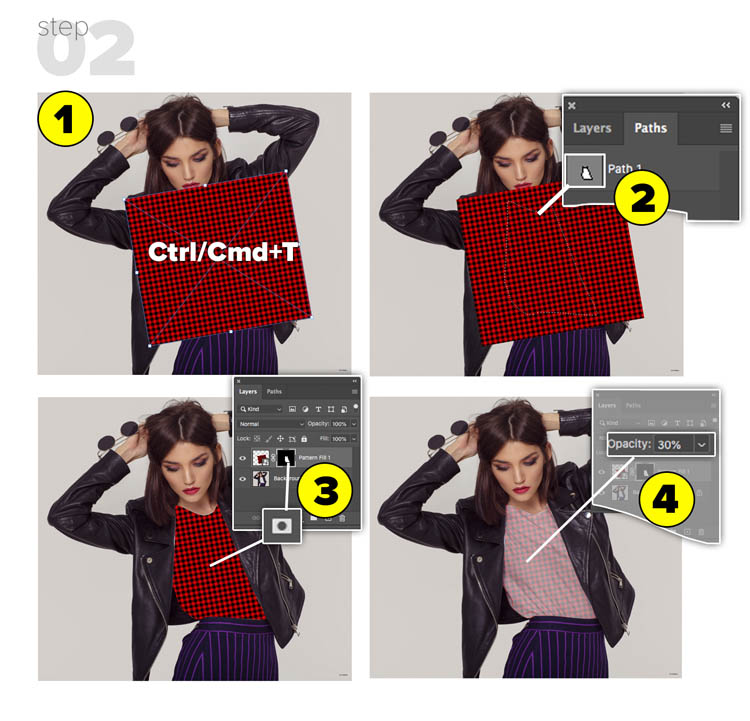
Step 2. POSITIONING THE PATTERN
1. Free transform the pattern into position. Press Cmd/Ctrl+T for free transform. Drag the corner handles to scale and rotate the pattern.
2. Make a selection around the shape of the object to wrap with quick selection. Her shirt in this case. I have already made a selection for you in the Paths Panel. Cmd/Ctrl+Click to load the selection.
3. With the selection active, press the Layer mask icon in the layers panel, a mask will now be made.
4. Lower the opacity to around 30% so you can see whats happening while you are working.
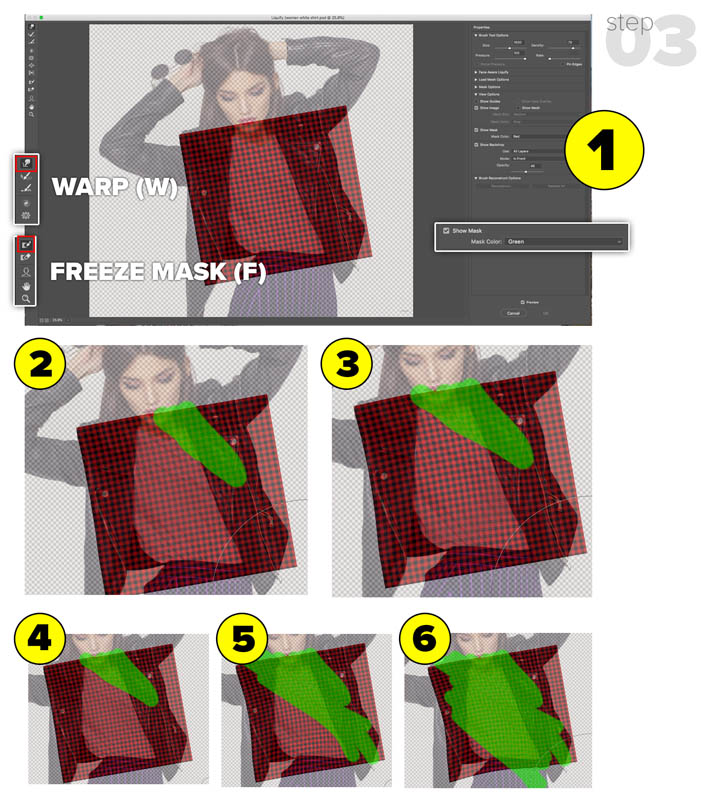
Step 3. WRAPPING A TEXTURE TO THE FOLDS OF A SHIRT
Displacement Maps: Please note: (There are multiple ways of doing everything in Photoshop)
This can also be done with a displacement Map (Tutorial here). A displacement map does a very good job of accurately wrapping each wrinkle, but has 2 shortcomings.
- #1 A displacement map will warp everything exactly the same amount, and not see a distinction between a crease and a wave.
- #2 A displacement map will only work with a solid color. If the fabric already has a print or pattern, the following method will work just as well as a solid color.
If you are an advanced user and don’t mind the extra work, and your fabric is a solid color, apply a displacement map first, and then use the method to fine tune the deeper folds.
1. Choose Filter>Liquify: The 2 tools we will use are the Freeze Mask (F key) and the Forward Warp tool (W). Learn the keyboard shortcuts, it will save you time.
Tip: Change the Mask color to something like green or yellow because the red won’t be visible against the red colored pattern.
2. Freeze Mask protects areas from being liquified. Paint on the top right, up to edge of the first fold.
Using a very large brush, push the pattern up towards to mask a little bit.
3. Paint up to the edge of the fold. (F)
4. Push with the Warp (W)
5 + 6 Rinse and repeat. Keep masking and pushing for each of the folds.
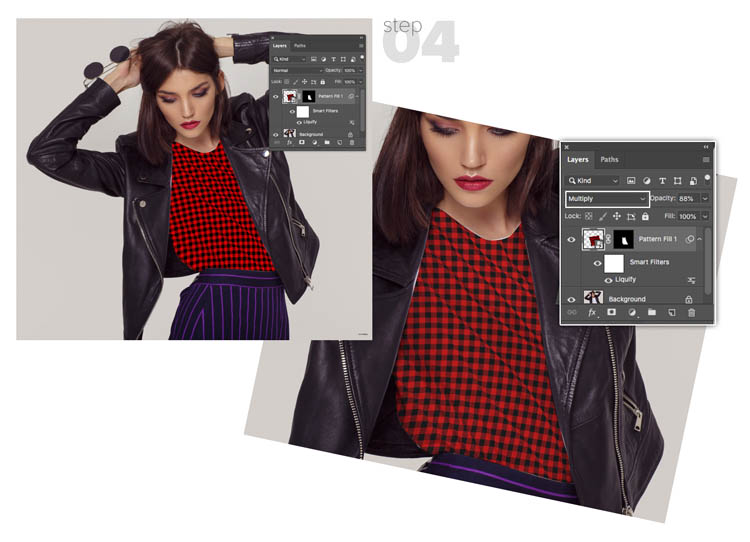
Step 4. BLENDING IN THE PATTERN
Click OK to apply liquify.
Change the layer blending mode to Multiply (Choose the best blending mode for your image and pattern.)
You can see that the pattern now warps and conforms to the waves of the shirt.
If you see areas where the old texture shows, such as the neck of her shirt, fix it in the layer mask by painting with black
Pro tip: There are other (optional) things you can do to sell this effect even more,
Create a new layer on top and fill with 50% gray.
Change to Overlay blending mode.
Paint on the folds with the Dodge and Burn tools to add shadow and highlight for more realism.
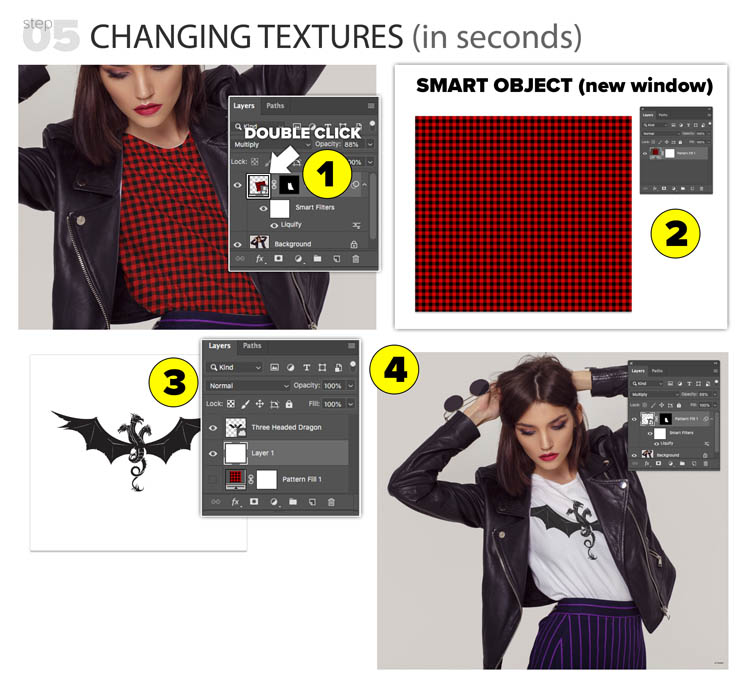
Step 5. CHANGING PATTERNS AND TEXTURES
1. Double click the Smart Object.
2. The Smart Object opens in a new window.
3. Bring in a different texture, or even a design. Save the file.
4. Go back to your original image and notice it updates to show the new pattern including all the liquify work we did.
I hope you found this tutorial helpful. If you did, please tell all our friends about the tutorial here at PhotoshopCAFE. Most of our free tutorials have both the written steps and video.
The post How to put a logo or pattern on a shirt appeared first on PhotoshopCAFE.